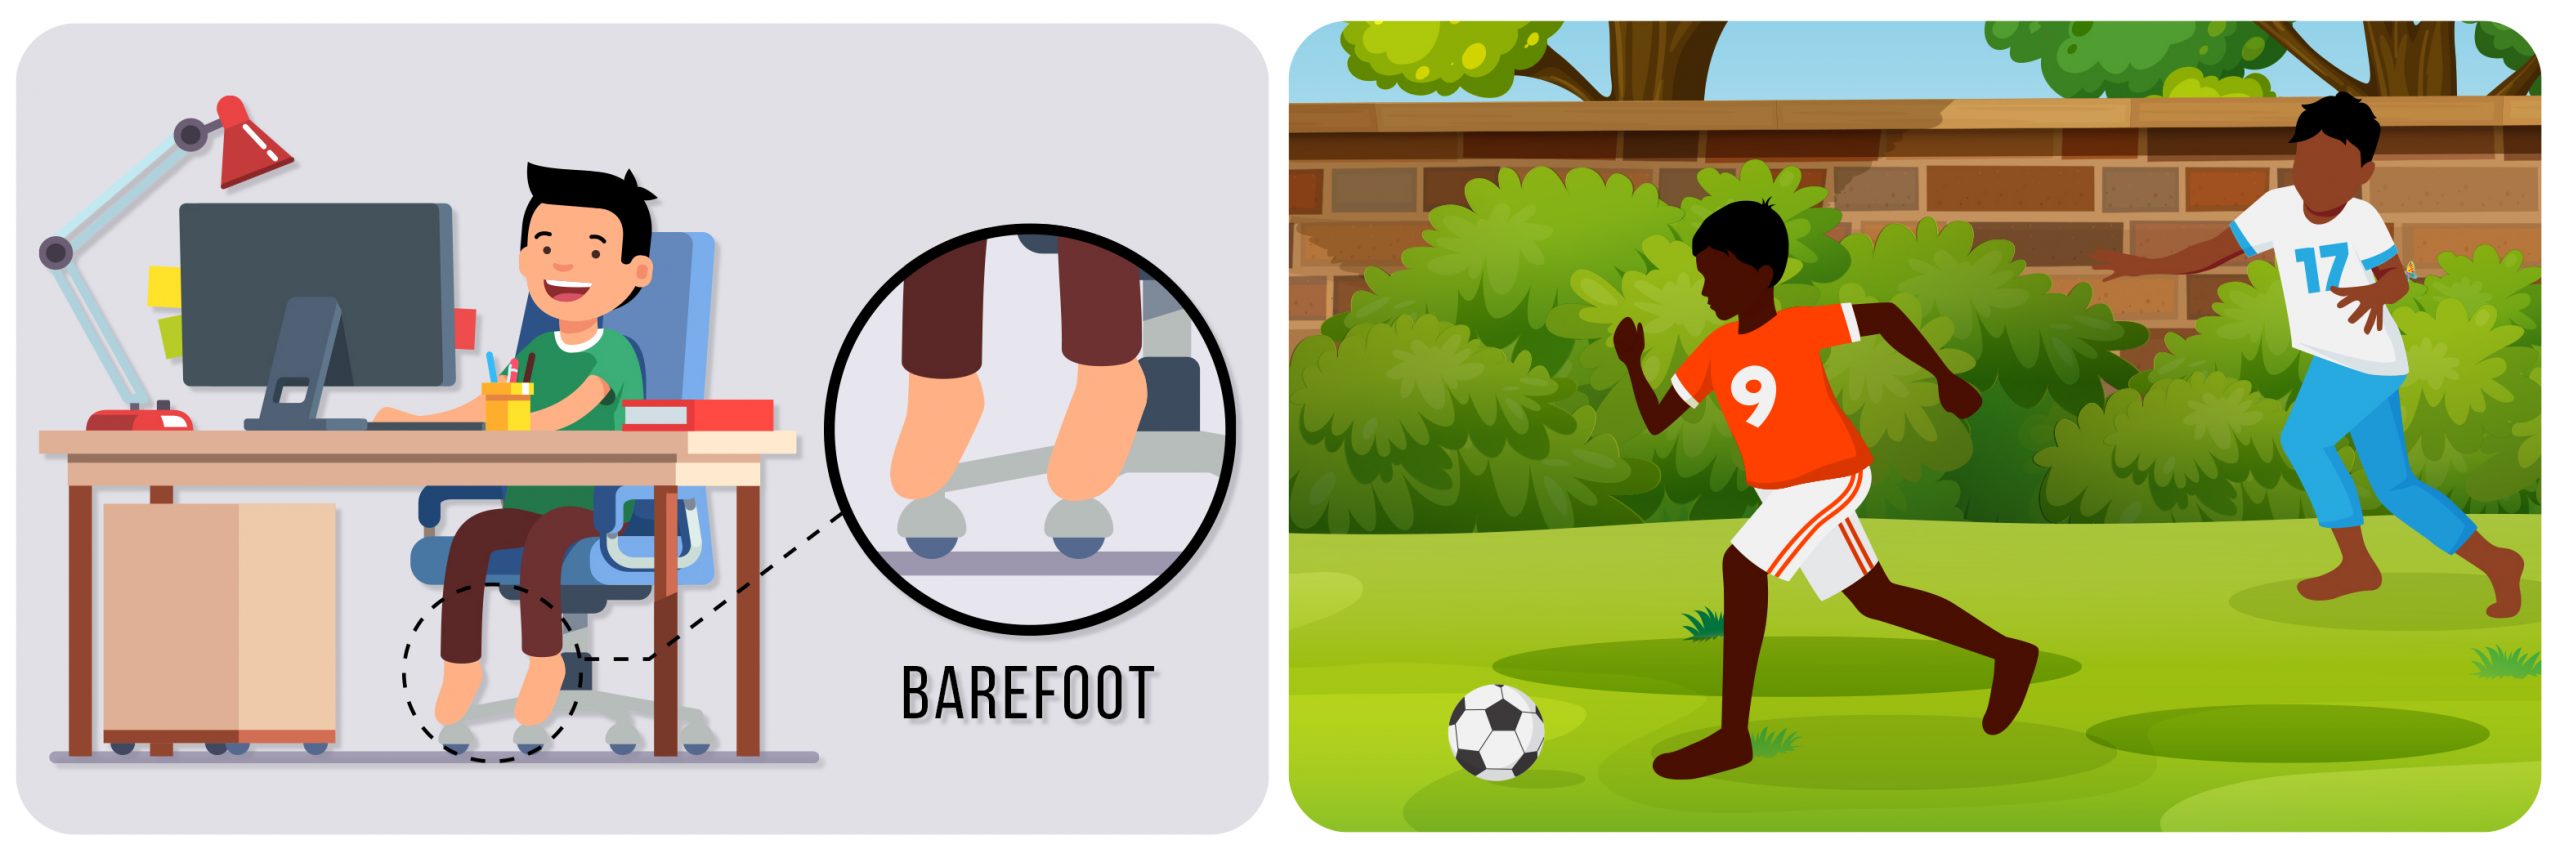
As we are all social distancing and mostly staying at home during these unprecedented times, many children are not wearing their school shoes with insoles. They are wearing shoes less and are more aware of their feet and toes.
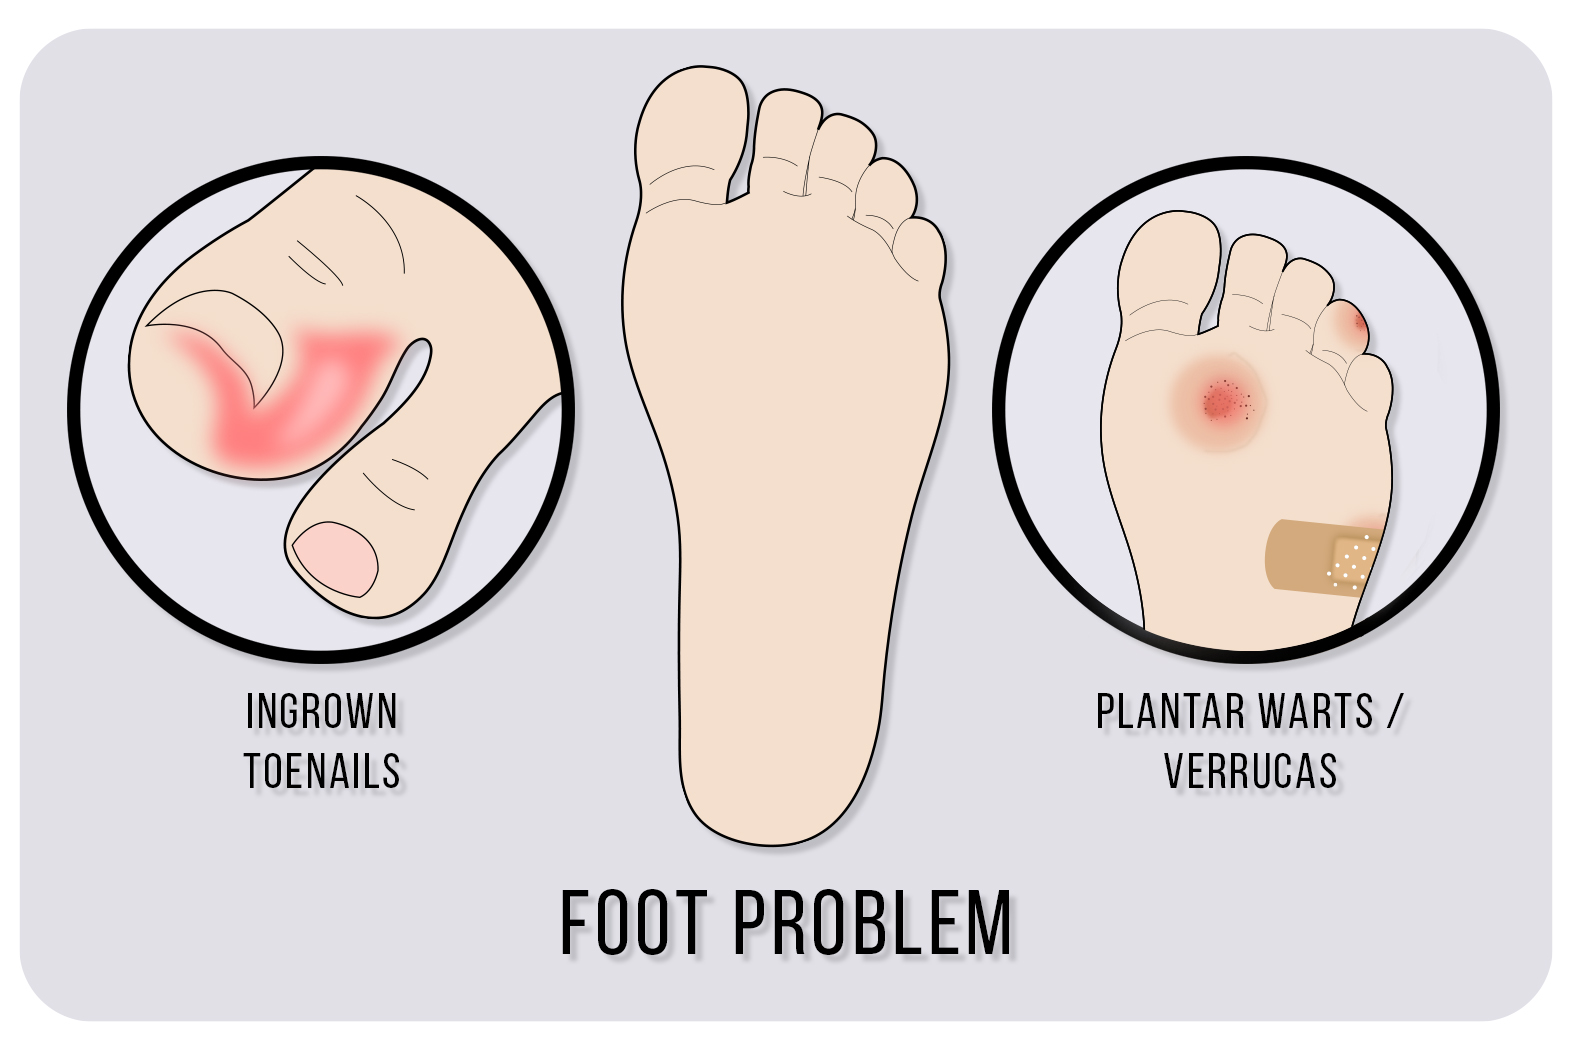
It is encouraged that children do not need to wear shoes whilst at home for many reasons. For example, if they have ingrown toenails this allows respite because there are no tight socks or shoes pressing on the big toenails, therefore, easing any toe pain and discomfort. It is also a very good time to have toenail procedures when the children are not going to school so that they can comfortably recover at home.
Furthermore, due to children being mostly barefoot, they are discovering any blemishes on their feet such as plantar warts (otherwise known as verrucas). Care should be taken not to pick and play with these blemishes as they can spread to their fingers and other parts of the body. It is a good idea to cover them with a band-aid or wear socks in the house so as not to spread to other family members. This time at home can be well spent by treating plantar warts, especially with treatments such as dermojet as children can rest at home afterwards. Our clinic nurses can offer more information on dermojet treatment, please see our contact details at the end of the page.
Additionally, as children are not wearing their school shoes there is very little foot support but this is not necessarily a bad thing. If the alignment of the foot and ankle is normal without shoes this can be advantageous because it makes the foot muscles work more due to lack of assistance from footwear.
Although, if the child does have bio-mechanical or alignment issues with the leg, feet or ankles, then not wearing shoes can be problematic and cause some pain or discomfort in the ankles, especially the arches. If the child already has insoles, we would recommend putting the insoles in a lightweight and clean pair of shoes for inside the house, so the child can wear the shoes for a few hours each day to ease any discomfort or pain they have due to bio-mechanical or alignment issues in the leg, feet or ankles.
Alternatively, please make an appointment with our Chief Podiatrist Michelle Champlin for orthotic therapy. This will help the child’s alignment issues progressively better.
For appointments and other queries: Call: +971 4 3435390 WhatsApp: +971 50 355 3024
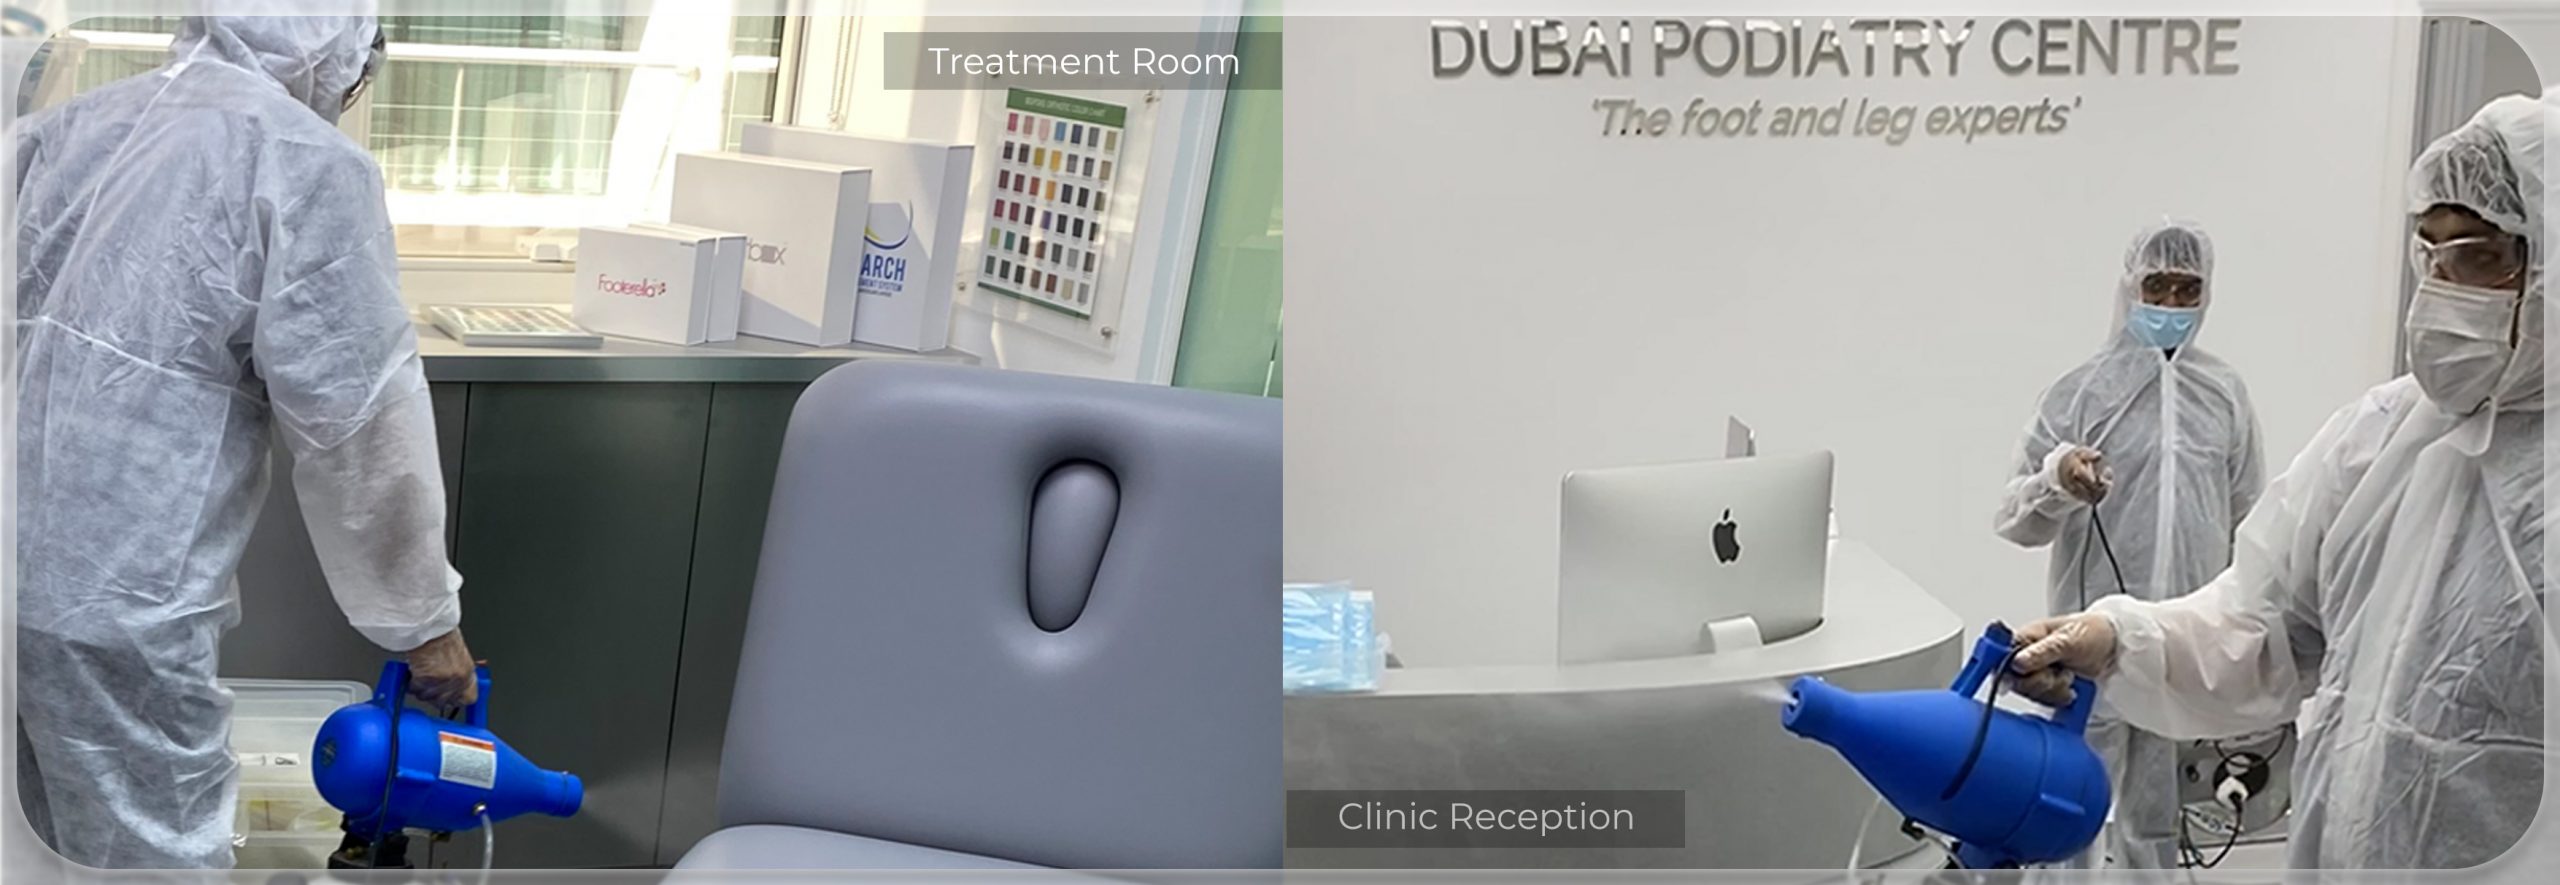
During Covid-19, the entire team at Dubai Podiatry Centre have been so impressed with how efficient and responsive Dubai residents have been to the new health and safety measures set in place by the Dubai Health Authority and World Health Organisation.
Therefore, we wanted to share the extensive precautions taking place at our clinic so that you are aware of what to expect when you arrive and what goes on behind the scenes before your appointment.
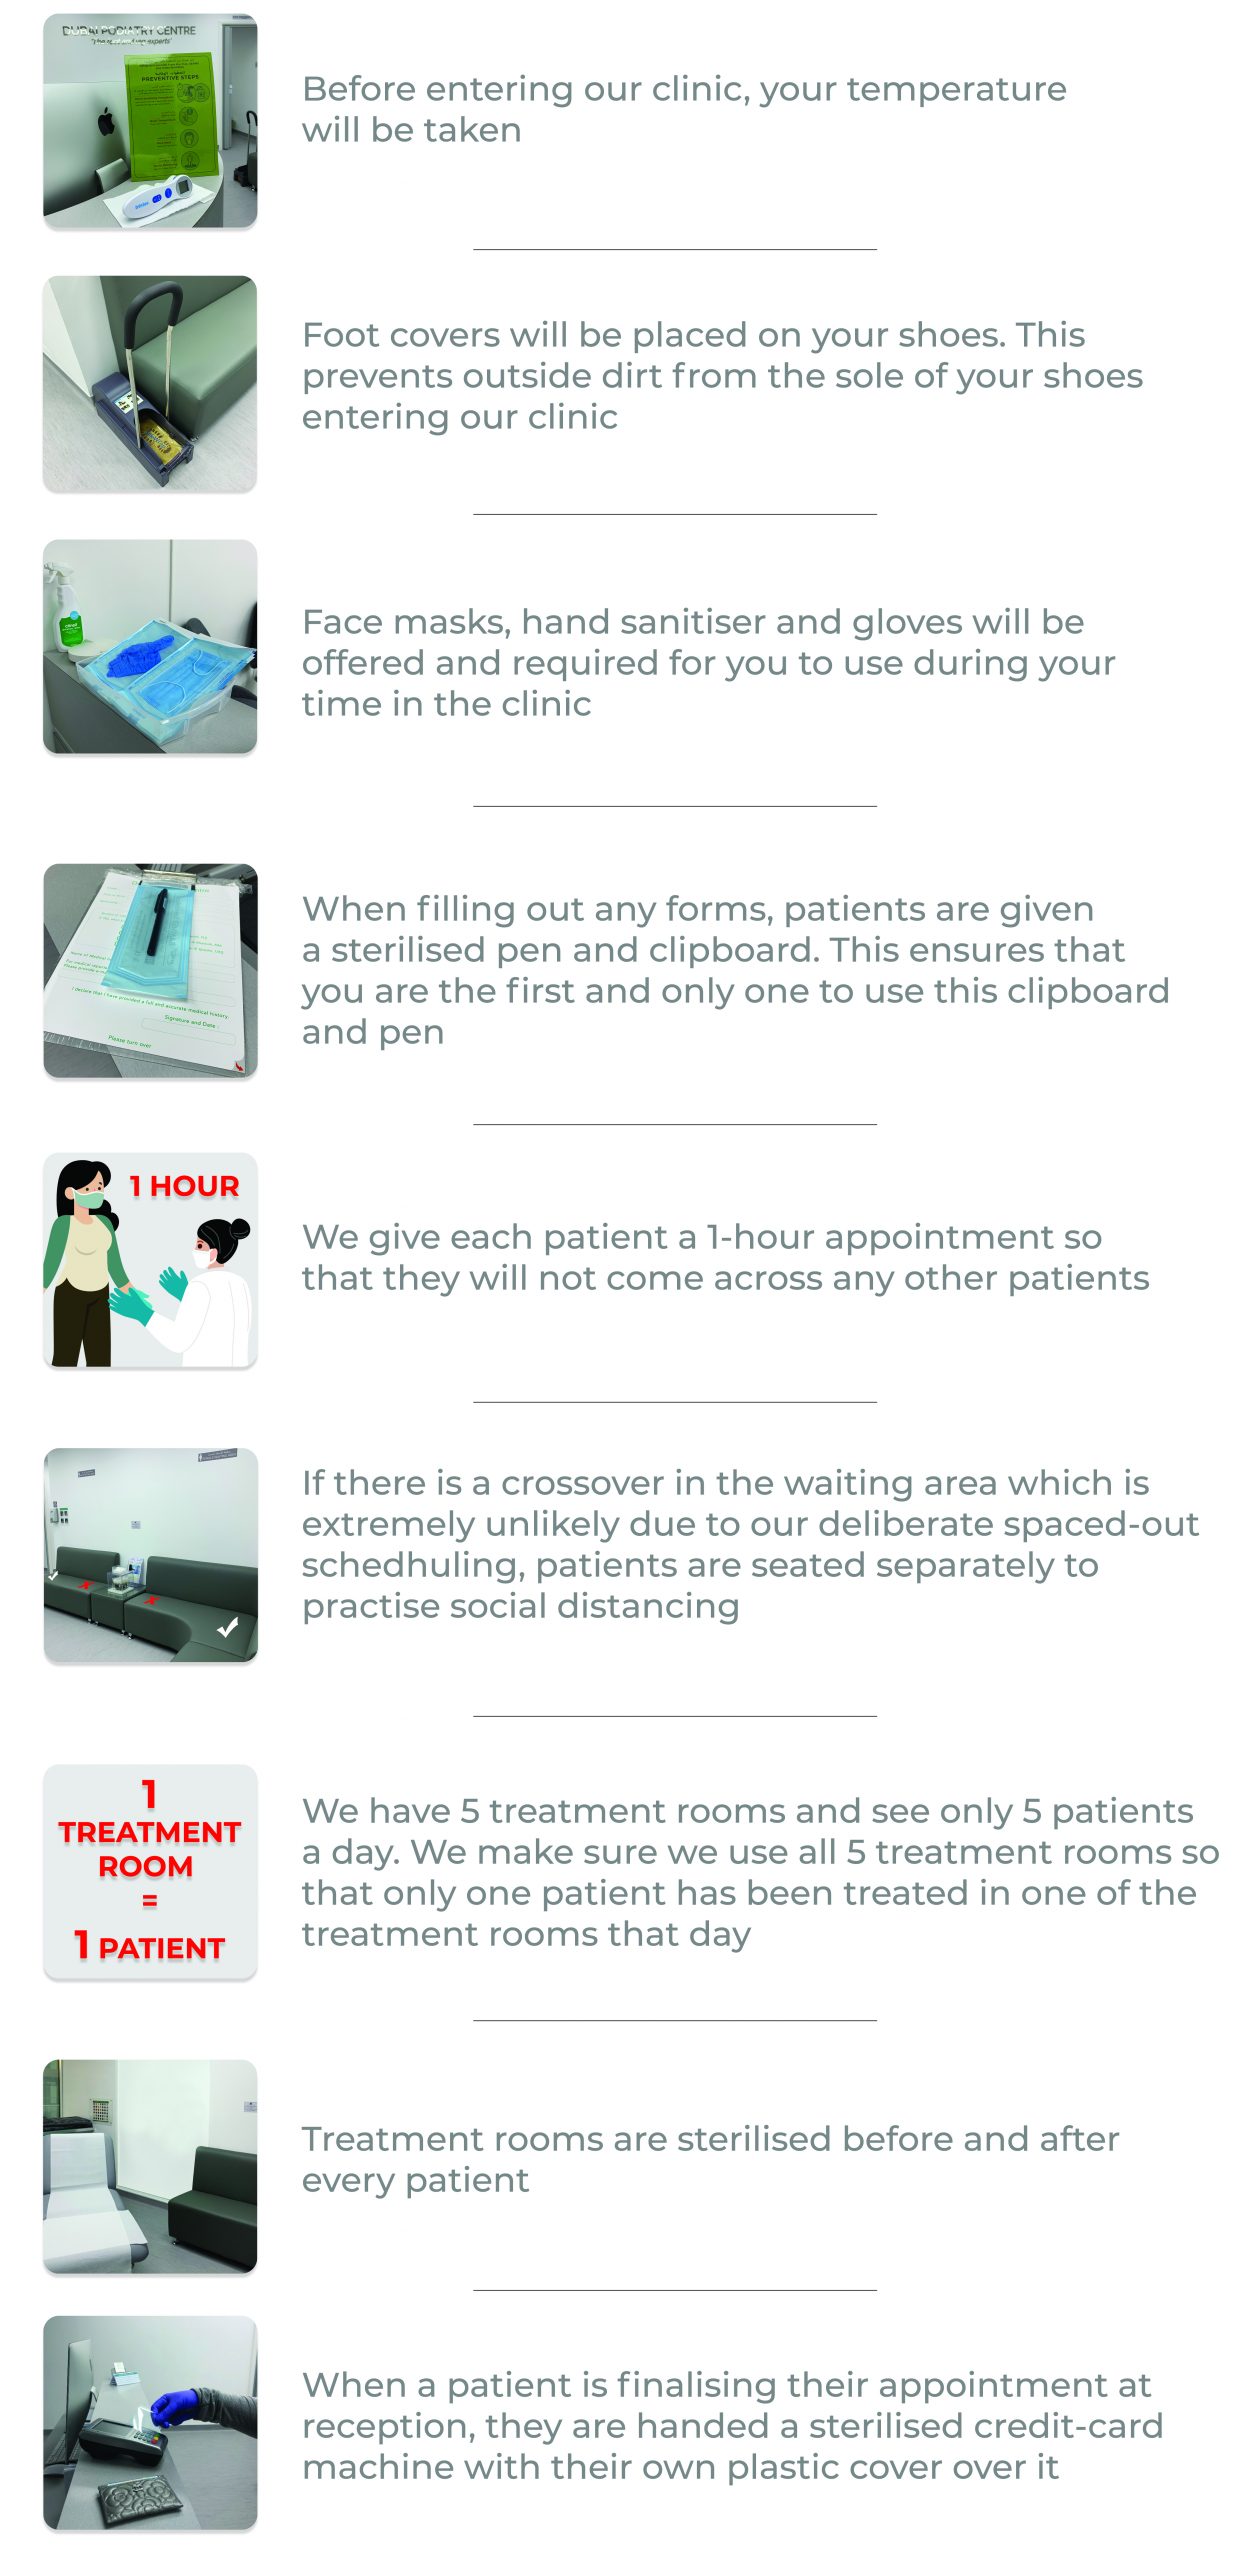
Firstly, our clinic is professionally cleaned by a sterilisation company (which is recommended by Dubai Health Authority and approved by Dubai Municipality) before we see any patients. This company specialises in purifying the air and all surfaces of the clinic. This is in addition to our own hospital-standard cleaning that takes place before and after every patient. Everyday, the temperatures of our staff members are checked and we all practise social distancing outside of the clinic.
When patients arrive at our clinic, there are measures we have introduced to ensure optimum sterilisation. Here is a step-by-step of what a patient should expect when arriving at our clinic:
Thank you in advance to all of our patients for your excellent cooperation, as well as our frontliners in Dubai.
Our entire team at Dubai Podiatry Centre wish you good health. Ramadan Kareem.
Plantar fasciitis is a painful foot condition that can happen in the heel and at the start of the arch.
It commonly only happens in one foot but can happen in both feet for several reasons. So, plantar fasciitis is a painful swelling of the heel bone where the planter fascia attaches. It is most painful in the morning or after sitting for a while. Putting sudden pressure on the foot by standing up after being inactive can create a sharp pain to the sole of the foot under the heel.
When the plantar flascia band engages it pulls on the swollen heel bone creating a lot of pain. However, after 20-30 steps the pain subsides as the inflammation in the body begins to disperse.
Although, the process of the plantar flascia engaging and pulling on the heel bone will create trauma again, so that when you sit down for a long time or sleep then go to stand up, the inflammatory process will start again in the heel bone.
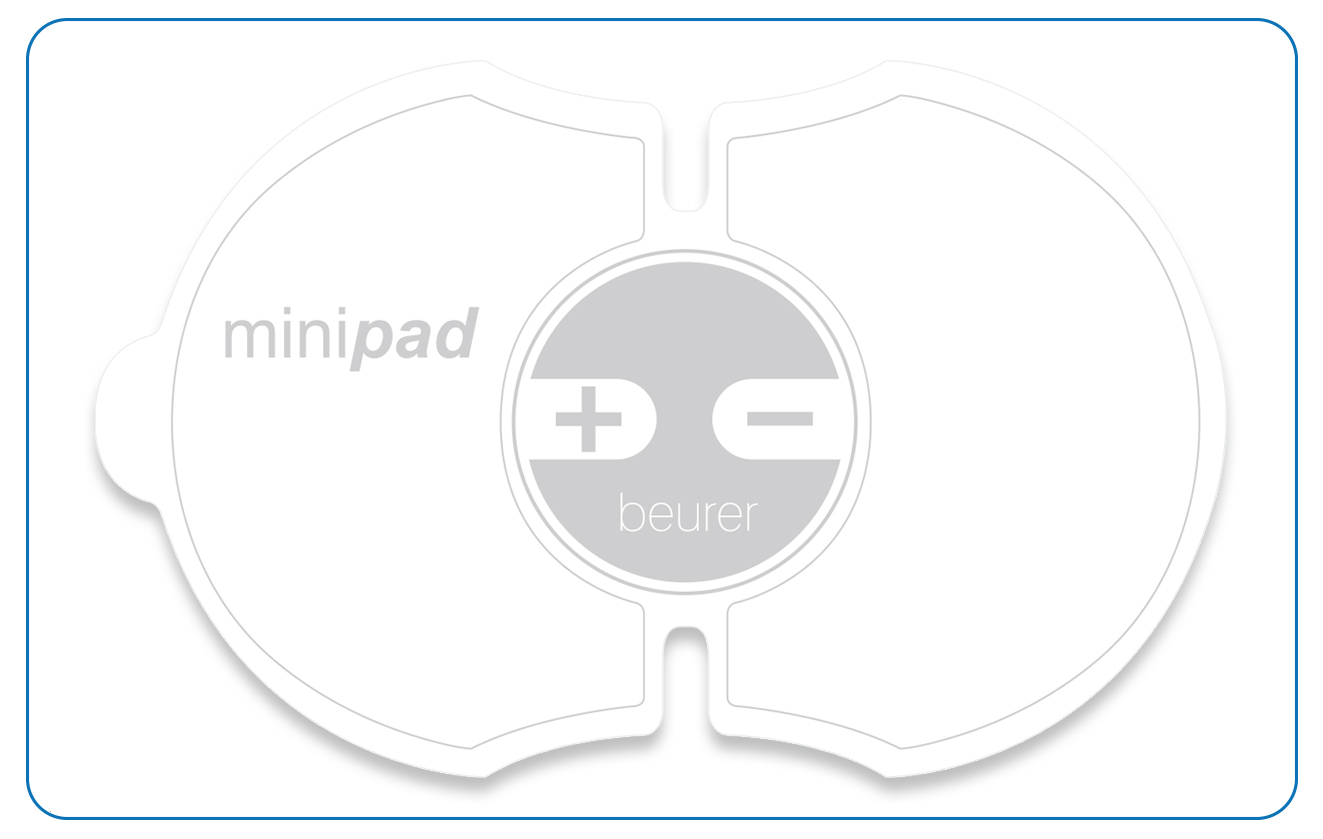
Measures must be taken to assess the plantar flascia to stop it pulling on the heel bone. These measures include blocking the pain signal using an electro-muscle stimulator which will also help to tighten the arch muscle helping the plantar flascia, and easing the stress onto it. The electro-muscle stimulator should be used for 10 minutes at a time and can be used up to 3 times a day.
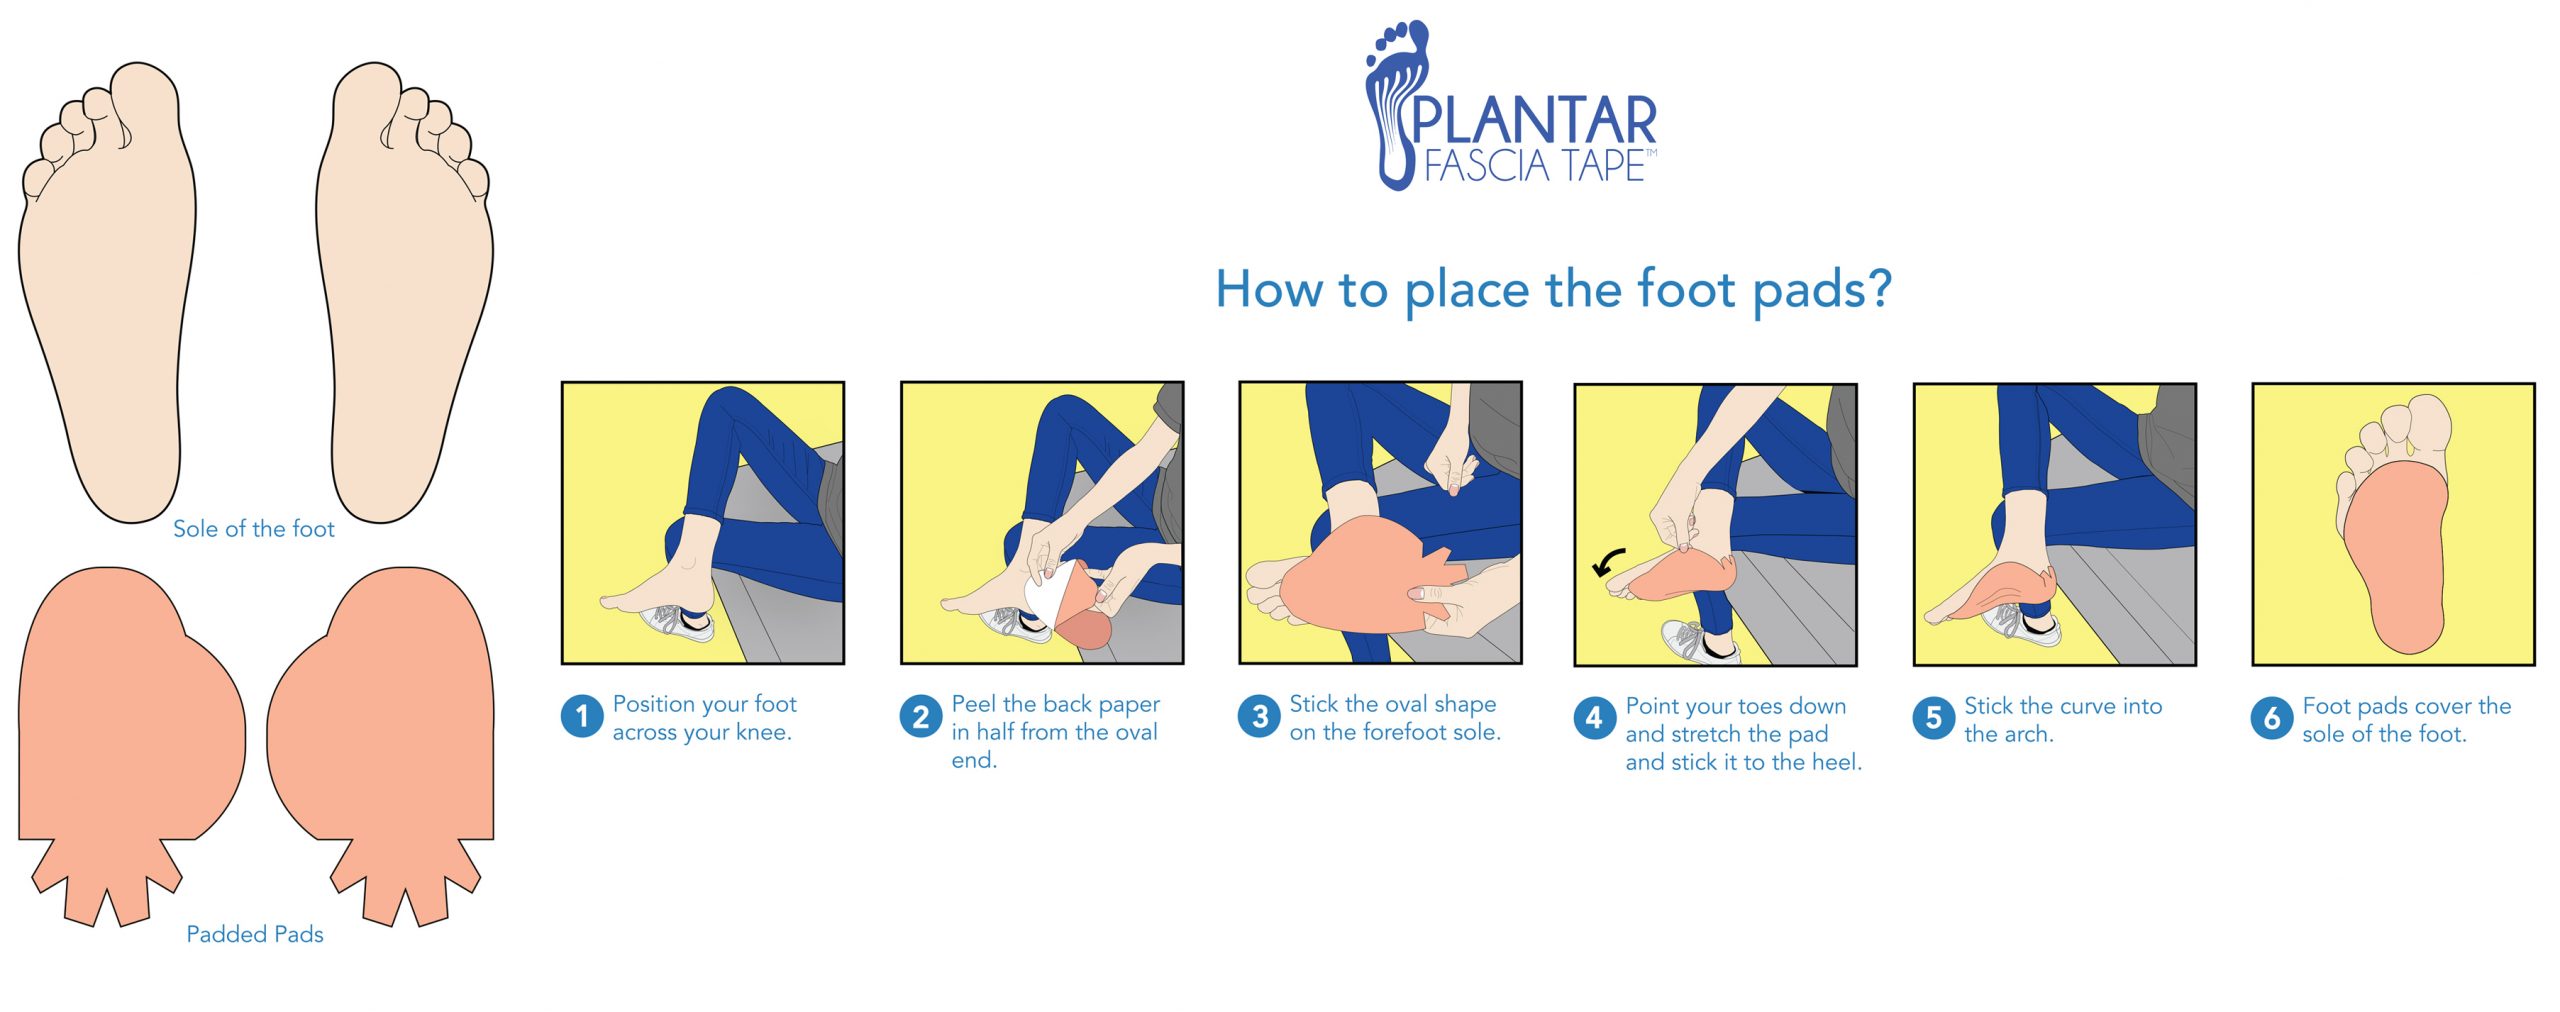
Another helpful device is something called ‘plantar fasciitis taping method.’ The plantar fascia tape used by the Footerella company makes this procedure much more simple. For example, instead of using lots of pieces of tape, it is only one strong piece of very thin felt that is applied. Using this non-stretchy material means that it holds the arch up efficiently. The tape can be worn during the day and at night time. It can be removed for showering, then a fresh piece should applied again on to the foot. It should be worn daily for up to a week to ease the tension on the plantar fascia.
Additionally, an insole is very helpful for easing plantar fascia. Insoles placed in shoes supports the arch and controls the movement of the foot. Most cases of plantar fasciitis happens on one foot where the foot or the pelvis leans in slightly. This puts intense stress on the plantar fascia band where it attaches on to the heel bone. By lifting this arch and aligning the ankle and foot, the plantar fascia can go back to its resting state.
For plantar fasciitis home treatment we recommend using the ‘mini pad electro-muscle stimulator’, the ‘plantar fascia tape’ on to the foot and an insole to help lift the arch.
For appointments and other queries: Call: +971 4 3435390 WhatsApp: +971 50 355 3024
Are you ever wondering why your flat feet causes back pain? Or how long it will take to gain foot arches and align your ankles?
And one of our most frequently asked questions… can you still wear stylish shoes whilst wearing orthotics?
Read this blog post for professional Podiatric advise for all your queries about flat feet for men, women and children.
Can I still wear sandals with flat feet?
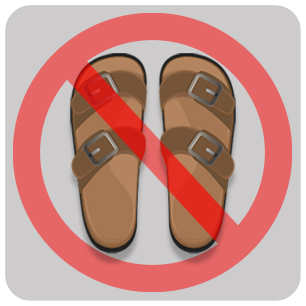
We ask you to limit the use of sandals during your flatfoot treatment. The reason for this is because we measure the angle that your flat foot is leaning in and then we counter-tilt you. So, if you wear a sandal with insoles during this time you are likely to have an ankle sprain. Therefore, supportive shoes that are strong soled with strong edges are the best during your treatment, however, times that you do want to wear a sandal if you are going to the mosque or you are going to the beach, those instances are absolutely fine to wear sandals without your insoles.
How long does it take for my flat feet to become straight and aligned?
Initially, we would take a gyps cast of the feet and measure how many degrees your foot is leaning in which is the underlying cause of flat feet. Once we know this angle we then counter tilt you so that the foot is aligned. We usually tilt the foot by 5° increments because any more than this will make the ankle twist. So, if you are 45° leaned in and you are an adult male, we would change the orthotic every 5° from 45° to 0°, which would be 9 pairs of orthotics at six week increments that would take approximately a year to complete this treatment.
Could my flat feet be affecting my sports performance – golf, football, etc?
Some types of flat feet are very useful for particular sports such as ice hockey but most sport involves having a stable and straight ankle. Your arch needs to engage as a spring for sports such as running and jumping so that is why some people at a certain age (usually teenagers) are not able to pursue their sporting career because there is swelling of the knees or many ankle sprains. So, if the sports person of any age starts to develop injuries from running (even if they are not in the foot) we always advise to come and have a biomechanical assessment with the Podiatrist to see if there is any underlying issue such as a leg length discrepancy or pelvic tilt that can be made better with corrective orthotics.
How can my flat feet cause back pain?
Flat feet are mostly due to the ankle leaning inwards, this causes internal rotation of the legs which in turn affects the hips, and the pelvis tilts forward. When this happens (particularly in men) it will put pressure on the lower part of the back and cause back pain. By tilting the ankles back to straight and lifting the arches, the legs externally rotate in to their neutral posture and the pelvis tilts back to normal alignment.
Do I need to have surgery to fix my flat feet?
It is extremely rare to need surgery to correct flat feet. The majority of flat feet actually occurs from the ankle leaning inwards and the arch of the foot then collapses. So, by tilting the heel bone straight to align the ankle and lifting the arch back up again, the flat foot should be cured. Of course, there needs to be hyperpronation in the ankle and subtalar joint present for the arch to be lifted for it to be cured, if the ankle is straight and the foot is still flat it may be due to a number of reasons such as excess of ‘fatty packaging’ on the foot that is seen in some areas of the world. It is normal or it can be a boney fusion in the foot from some various diseases so the Podiatrist needs to assess the foot to make sure that the foot can corrected.
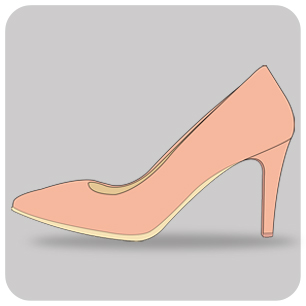
I still want to wear high heels/stylish shoes… can I do this while wearing orthotics? Do I have to wait until my treatment is over?
Whilst orthotic therapy is occurring, the foot must be held at 90° to the leg which means flat shoes must be worn during the orthotic treatment. However, if you want to wear high heels for a special occasion or for an important meeting that is absolutely fine to wear high heels without your insoles, but most activities and daily life we need you in flat shoes to get the ankle back to a neutral position.
Is it too late for me to fix my flat feet?
It is NEVER too late to correct flat feet! In fact it is actually faster with adults (especially adult males) as children take longer to correct because they have human growth hormones that make the ligaments very stretchy. It is these ligaments that we need to contract and tighten in to a straight position when we are aligning and lifting the arch and ankle joints. So, adults (especially males) have the fastest results because every 5° that we tilt the foot takes six weeks, and with children the equivalent time takes 3-6 months.
Are my flat feet the cause of my bunions/corns?
Flat feet are usually caused from the ankle leaning inwards. The arch of the foot is actually made up of quite a number of bones and when the arch collapses the first metatarsal can end up falling out of the foot and away from the big toe joint which is what is commonly known as a bunion. Usually, if we are going to correct a bunion non surgically, or make it better, we will align the ankle straight again using an orthotic to lift the arch. Also, if we have to align the big toe we will use an electro muscle stimulator designed for the foot and some sports tape to keep the big toe straight for a number of weeks.
How long does my child have to wear orthotics? Will they still be able to participate in school sports?
The child’s ankles and flat foot will be measured to see how many degrees the feet are leaning in. With the child we can get 5° every six months and with every six months it depends on the ankle alignments. So if the child is 25° leaning in we would tilt the child’s orthotic 5° every six months, so in a 25° child it would take 2 1/2 years. The maximum time is 4 1/2 years if we see the child regularly every six months.
What is the best school shoe/PE shoe for my child? Which brand?
For school shoes and PE shoes rather than the brand being important it is more about the structure of the shoe. We always want a strong soled shoe with strong support. Sometimes the better known brands are more expensive because there are more components and reinforcements inside the shoes, instead of very soft soled shoes. So, shoes from well-known brands that keep children’s health for their feet are the most desirable.
My child has ‘knock knees’ when they walk and stand. Will orthotics help fix this?
Knock knees are where the knees come together and this is what happens when both legs lean inward. If it just happens on one leg we call it a ‘K’ leg because one leg is straight and the other one leans in at the knee. There are two main reasons why the knees can knock together, it is either from the hip and pelvis, or it is coming from the ankle and feet. So, the podiatrist will assess the feet to see if the ankle can be straightened and if this sorts out the alignment of the leg then it is only coming from the foot. If the foot and ankle is normal and the knees are still knocking together then the problem is coming from the hip and the pelvis. It is easy to assess this, the podiatrist will align the feet and if the legs go straight it is only coming from the feet. Orthotics will align the ankle and are worn at six months increments. We change the angle of the orthotic 5° every six months but the whole time the child’s ankle, feet and knees is held in a straight position with an orthotic that goes inside the school shoe and sports shoe and is to be worn the majority of the time.
For appointments and other queries: Call: +971 4 3435390 WhatsApp: +971 50 355 3024
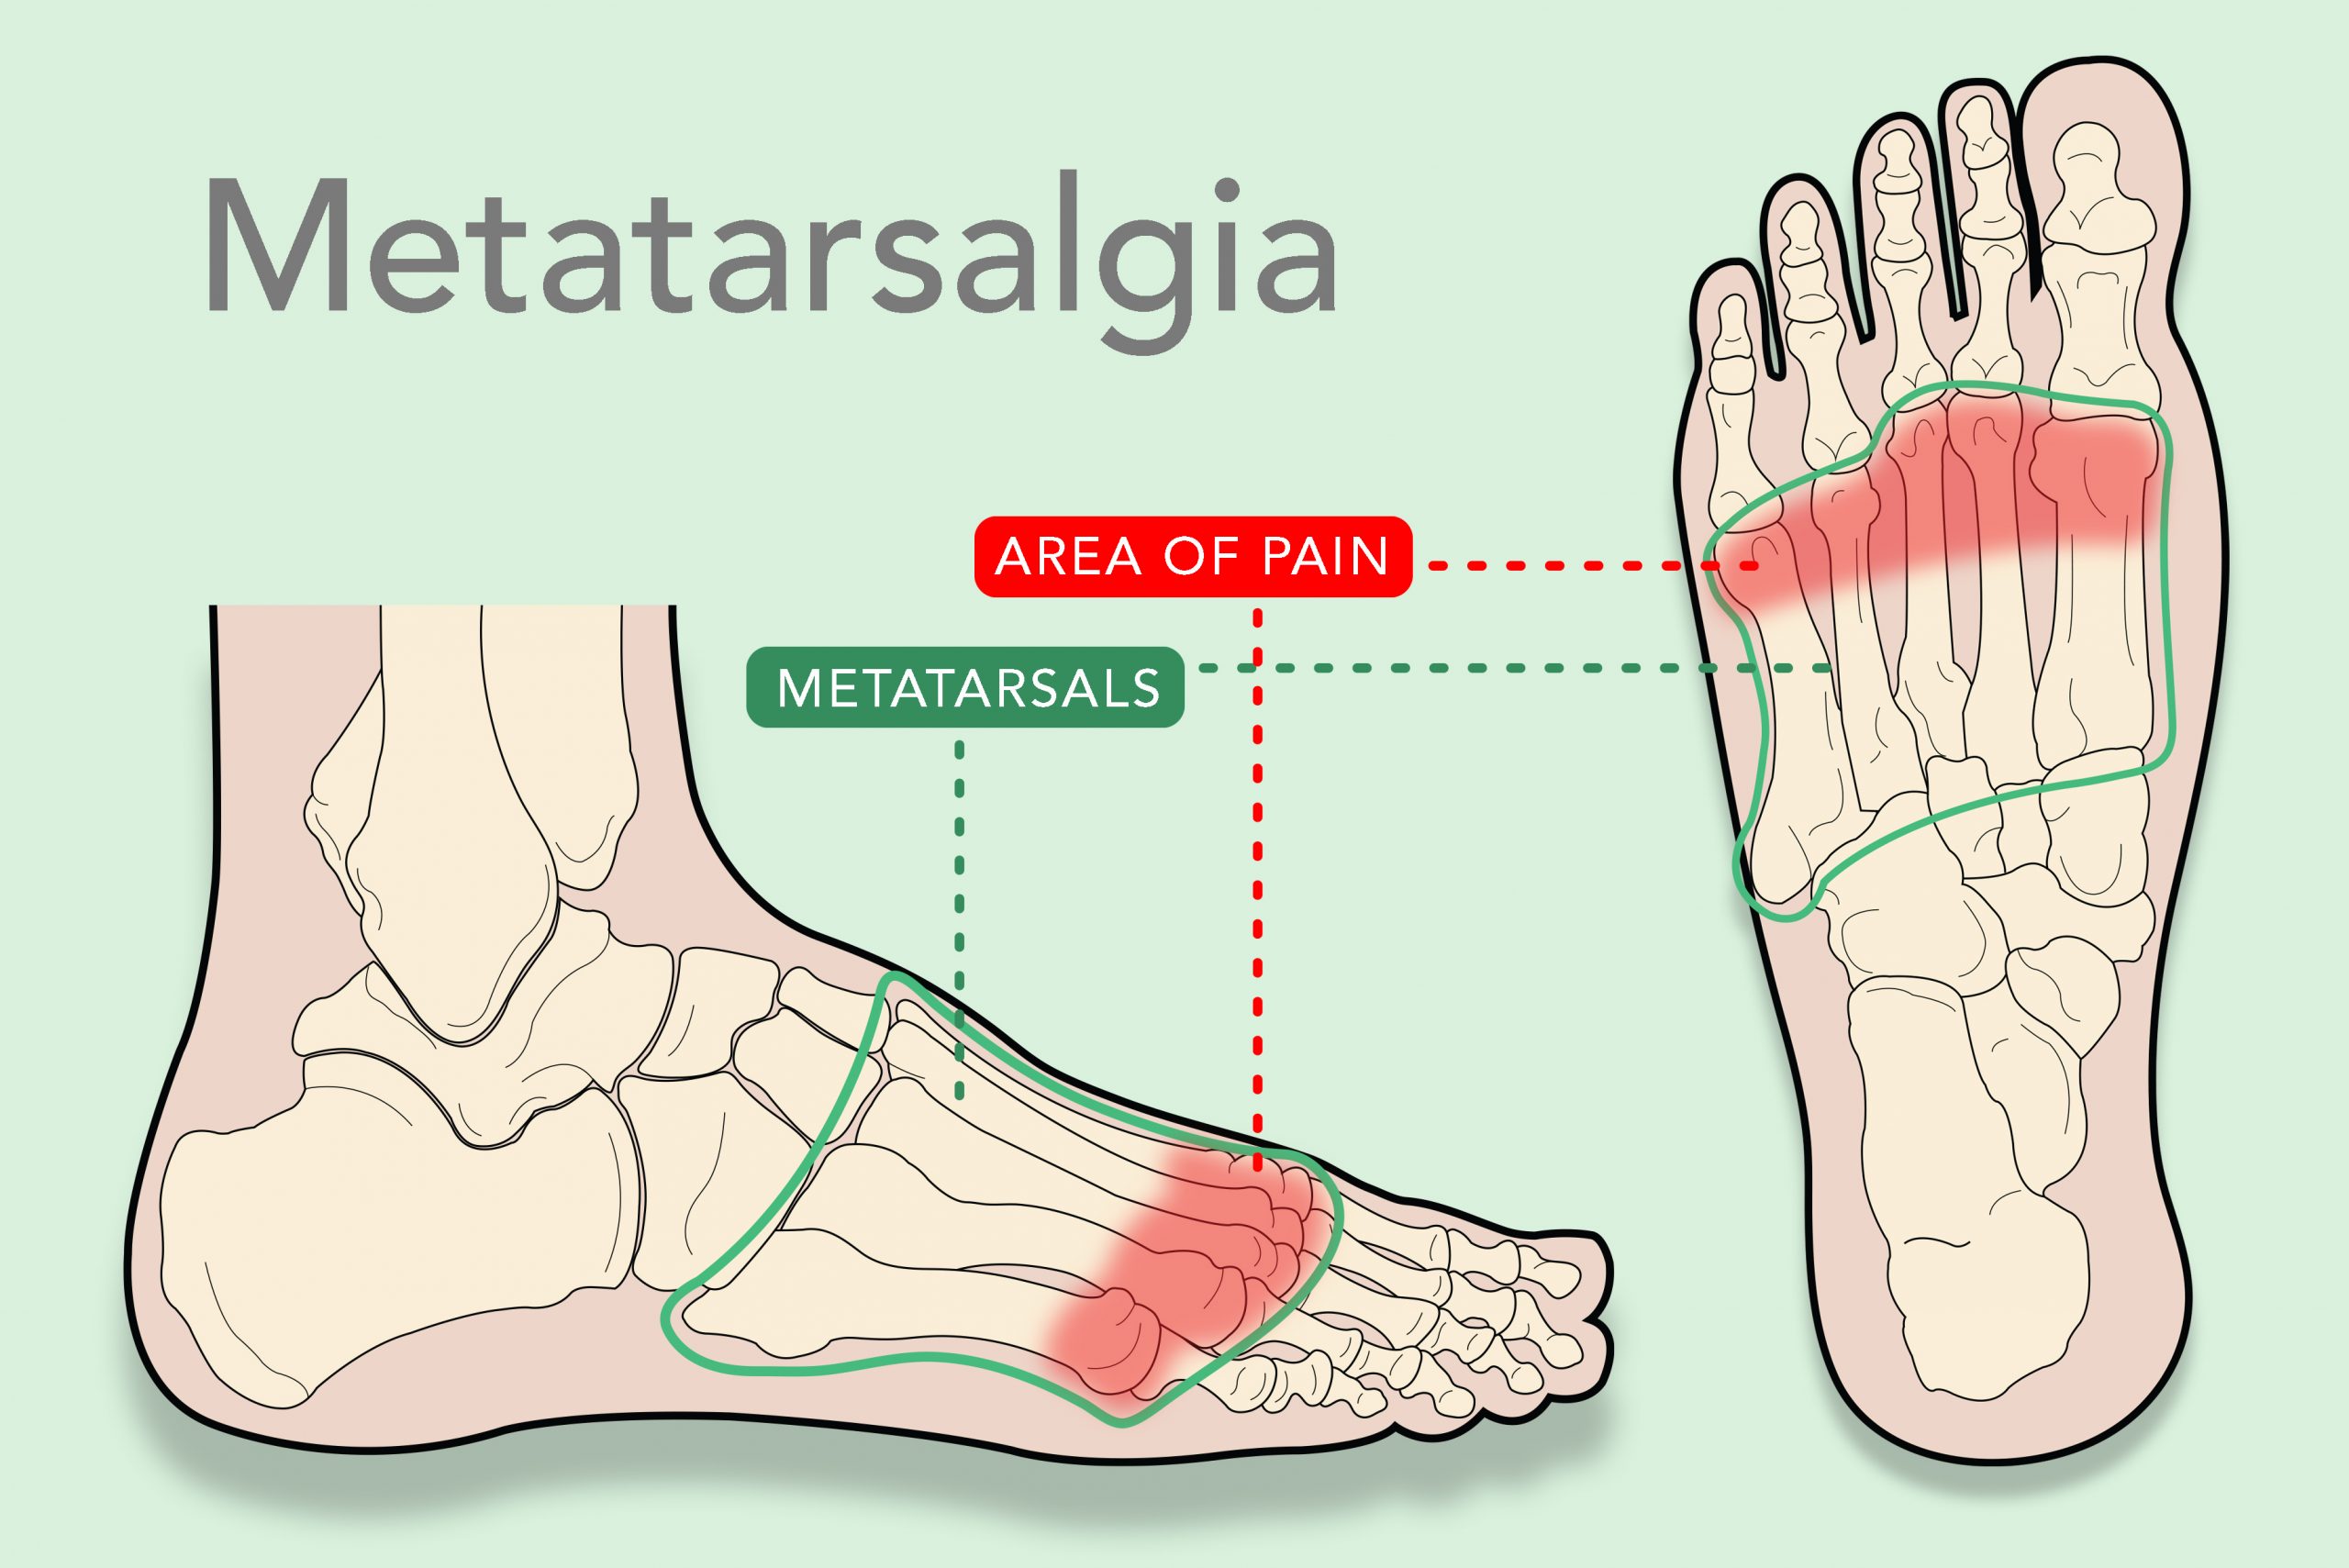
Pain in the ball of the foot and sometimes the toe area, if you google it, most of the time it comes up saying ‘Morton’s Neuroma.’ Now, Morton’s Neuroma is very, very rare and it can happen in between any of the inter metatarsal spaces where the heads of the bones are. Morton’s Neuroma is a tumor of the nerve so it’s very, very rare but it’s commonly used to describe pain in this area.
What’s very common is to have Morton’s Neuritis which is inflammation of the nerves that feed the space in between the bones, and a dropped metatarsal. If any of these metatarsals drop down, pressure on the head of the bone will send pain signals to the inter metatarsals nerve space as that’s where the nerves are. Most commonly, all we need to do is lift the second, third, and fourth metatarsal heads so that it is the same as your hand. As you see with the hand the third metacarpal is the highest. So, in the foot we also want the third metatarsal to be the highest. That’s why by lifting the metatarsals back up again (the second, third and fourth) it can make the pain underneath the foot go away almost overnight.
If it is Morton’s Neuritis sometimes the nerve can be so inflamed that it may take many months for the inflammation of the nerve to stop giving you pain or numbness even if we lift the ball of the foot.
Now, also if there is a cyst which is kind of common also in between any of the metatarsals, so if the bones are rubbing together too much the toes will begin to separate. So, if there is a cyst the toes will show that cyst up by beginning to part. Therefore, the toes show up what the metatarsals are doing.
If you have pain in the ball of the foot we call it ‘Metatarsalgia’ – it means pain in this area. But, there are lots of different reasons, we would need to investigate what was giving the Metatarsalgia which just is a general name for pain in this area of your foot.
So, we don’t know if it’s a drop metatarsal, a pinched nerve, a cyst, a neuroma tumor. That’s why we need to find out by looking and assessing your foot, finding out what the issue is and what are the best options to correct it.
Happy Friday!
For appointments and other queries: Call: +971 4 3435390 WhatsApp: +971 50 355 3024
Today we’re going to talk about warts to the feet.
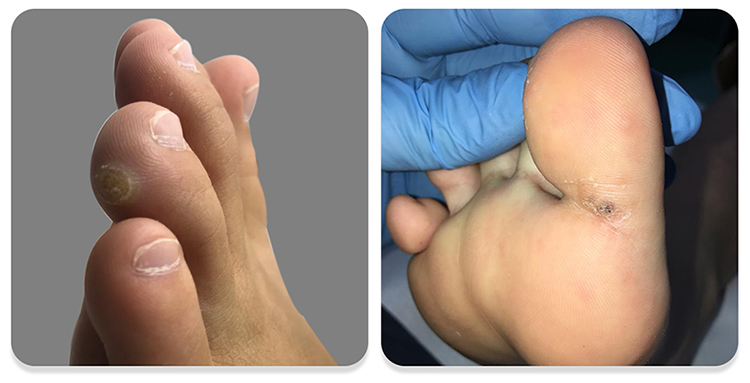
A lot of the time warts can be misdiagnosed as corns but they both look quite similar and under a microscope they look very different. For a corn, you really get under one of the heads of the bones or on one of the fifth, fourth, third to second toes. You get them from high pressure areas.
But, a wart can be anywhere on the foot. On the heel, on the outer edge of the foot, under the arch, under the ball of the foot, on the toes, tip of the toes and other places of the body. What we do for warts is something completely different to what we do for corns.
So, for corns we would redistribute the pressure from the corn area or you would wear wider shoes. For warts, we would do something called ‘Dermojet’ which is what we’re really known for at Dubai Podiatry Centre. Dermojet is a micro jet of liquid that goes into the skin. With warts, they grow really deep into the tissue area of the body. For the rest of the body, they grow outwards on top of the skin. But, on the sole of the foot they get drawn into the skin so they go very deep and that’s why traditional methods of cryotherapy, of salicylic acid and superficial treatments are quite difficult to get rid of a wart. Sometimes, these traditional methods can anger the virus and make it spread, so Dermojet penetrates the skin and subdermal tissue layer to rectify the situation and get rid of your wart for you.
Enjoy the rest of your Fiday!
For appointments and other queries: Call: +971 4 3435390 WhatsApp: +971 50 355 3024
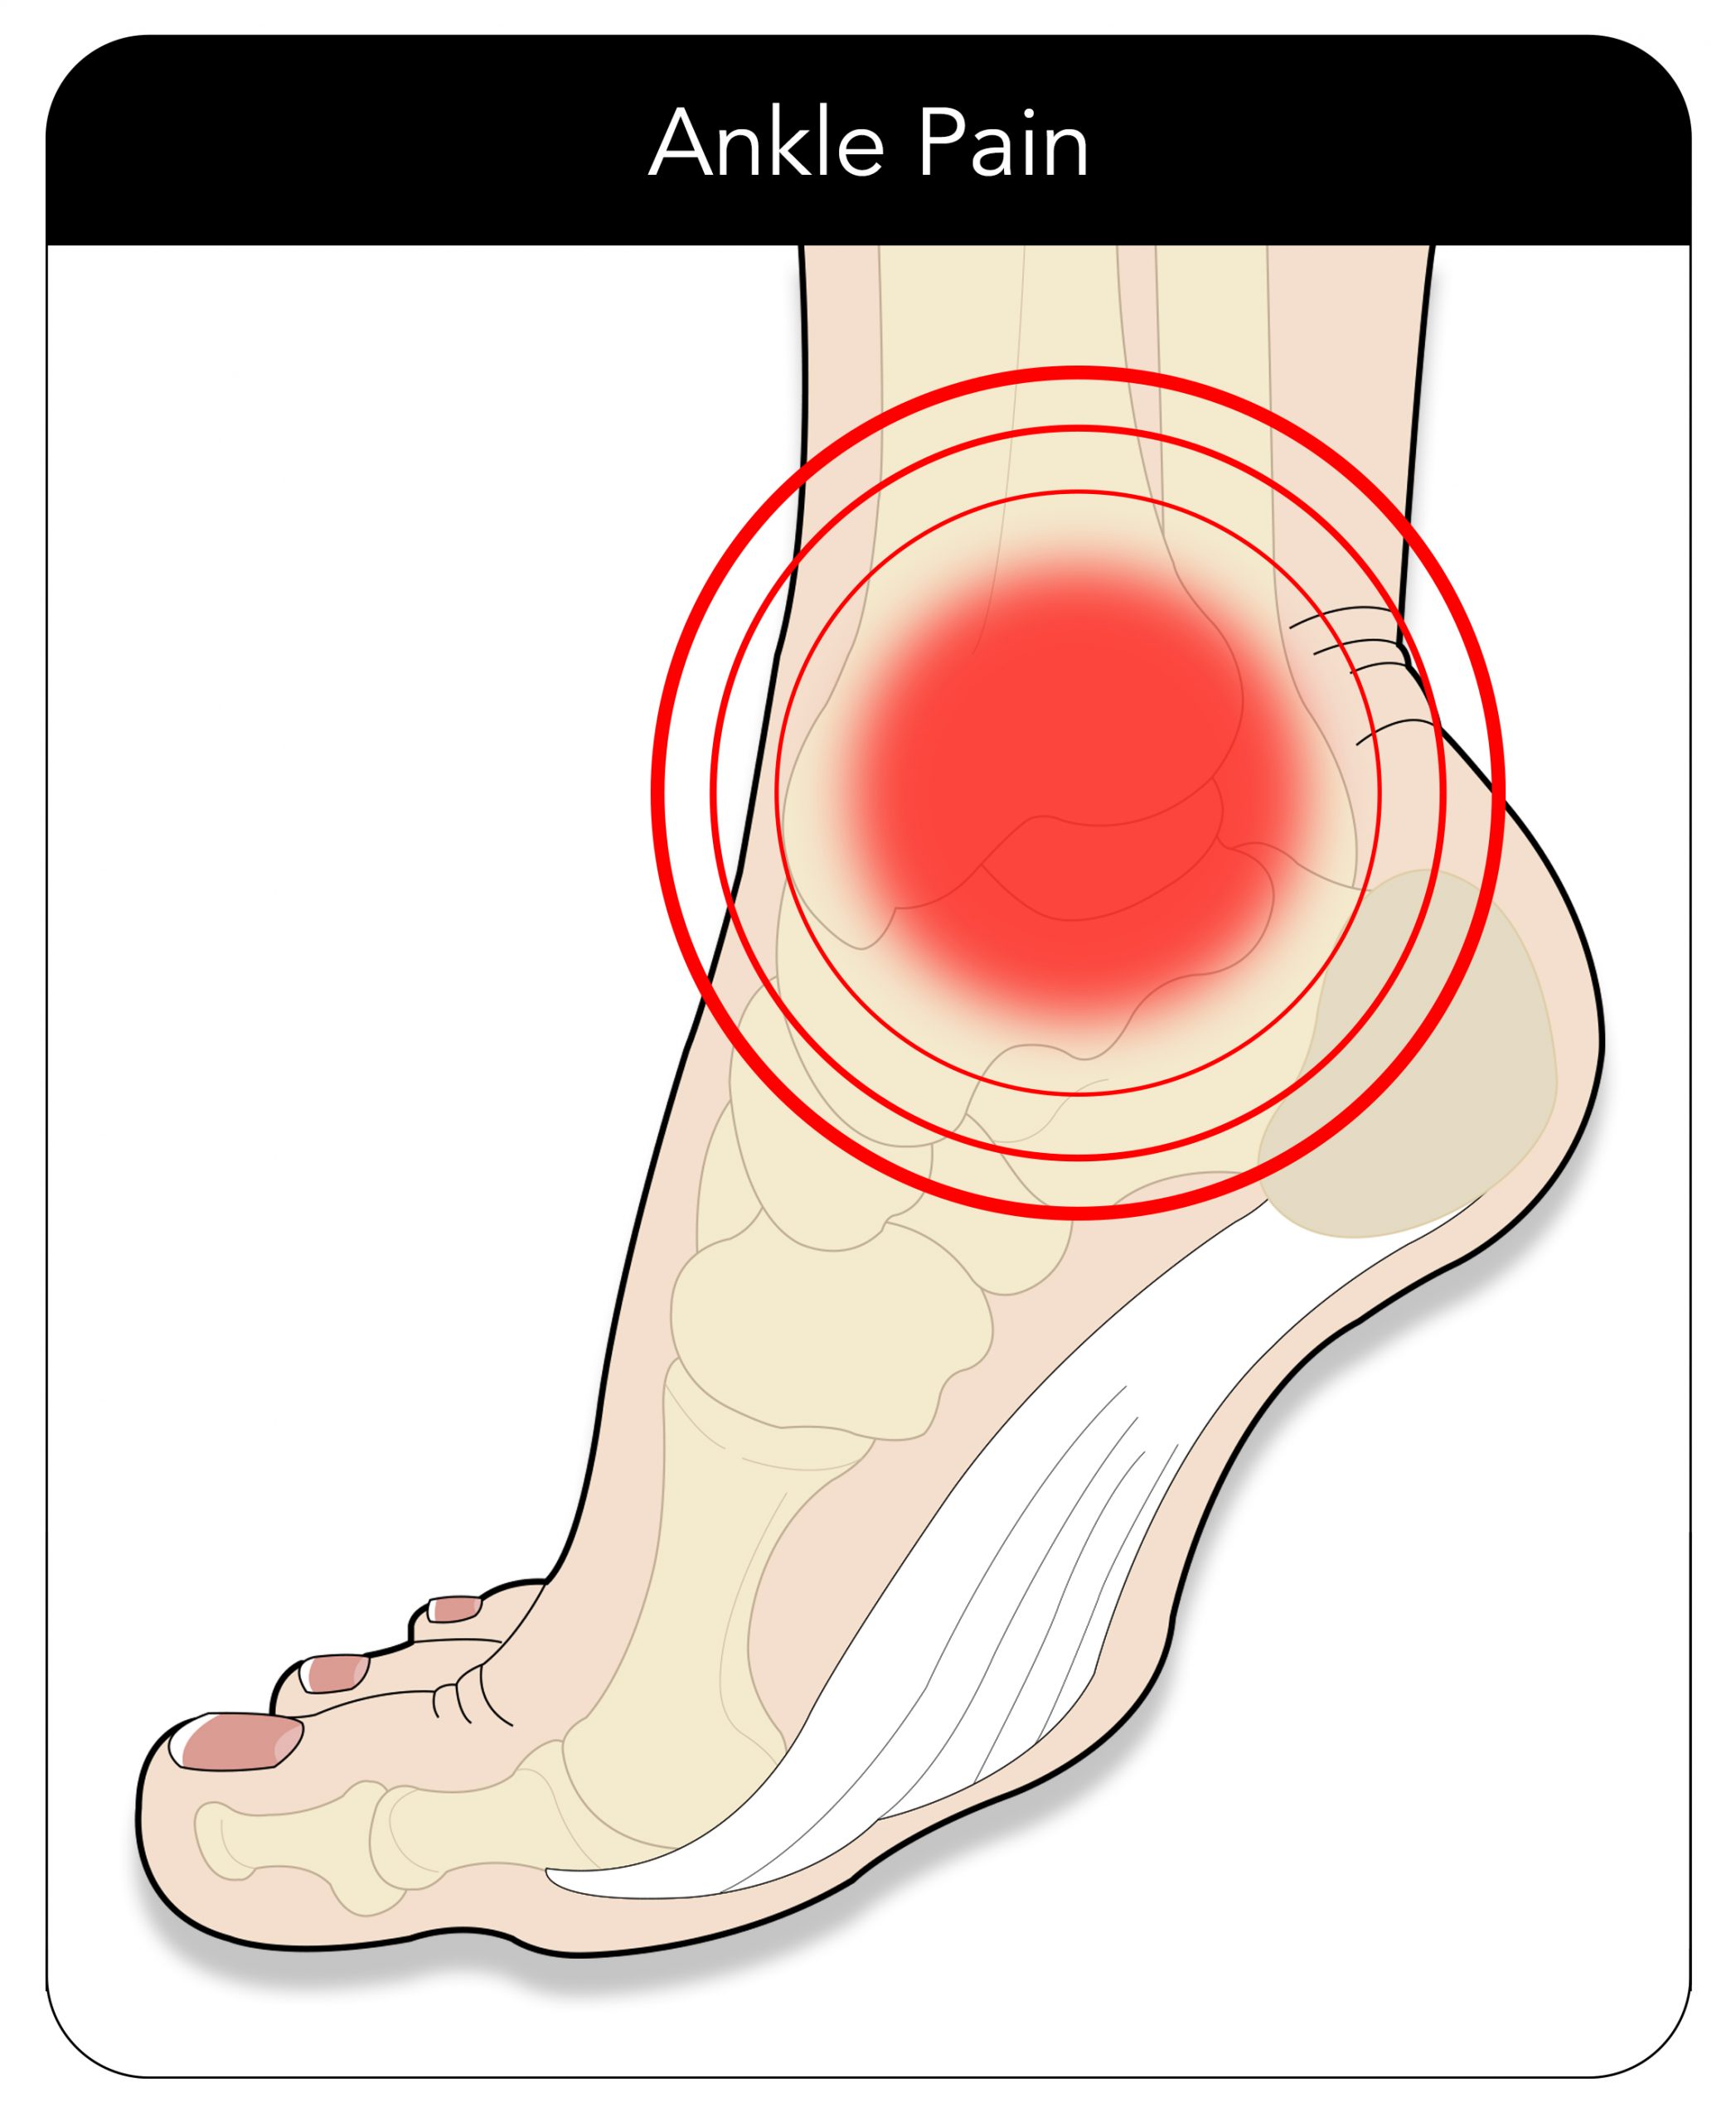
So, there are some ligaments on the outside of the ankle and most people know about these when they’re walking and they suddenly go over on the ankle and the ankle ligaments can hurt a lot. There can be bruising, blood and swelling. There’s also ligaments on the inside of the ankle but it’s more difficult to roll your foot this way, so this is the easiest way to roll your ankle instead of this way. In any event, when you have a bad ankle sprain it is always advisable to wear a very supportive ankle brace and normally ankle braces have a stirrup that comes here made of something hard, and another stirrup of something here, and then something underneath the foot here so it helps to keep the ankle straight. In severe cases, a plaster cast may be put on the ankle to keep the ankle straight, or ‘moon boots’, or an air cast and that’s something that keeps the ankle straight – maybe for two weeks and sometimes even up to six weeks when the ligament is sprained.
Now, if you have had a bad ankle sprain on the outside of your foot, sometimes after a few months or even a couple of years the ankle can start to drift inwards because if you over stretch these ligaments (it is like a piece of elastic that has been stretched out too much) and the anchors of the ankle begin to drift allowing the foot to lean in. Then, the plantar fascia begins to hurt as well as the muscle belly here. So, ankle sprains should be taken seriously! Either a very supportive ankle boot, an air cast or strong reinforcements at the side can normally be bought from the pharmacy and should be worn for about two to six weeks to make sure the integrity of the ankle stays straight.
For example, if you have had a problem with the ankle a few years ago and are noticing that your ankles are beginning to lean in and the arch is beginning to hurt, and the fascia on the heel is beginning to pull. We can always make an insole underneath your foot that lift the arches but more importantly tilt the ankle back to straight again. So, if you have had a previous ankle injury that you think is giving yourself a problem, then come and see us and we will align the ankle back to straight again.
I hope that helps and enjoy the rest of your Friday!
For appointments and other queries: Call: +971 4 3435390 WhatsApp: +971 50 355 3024
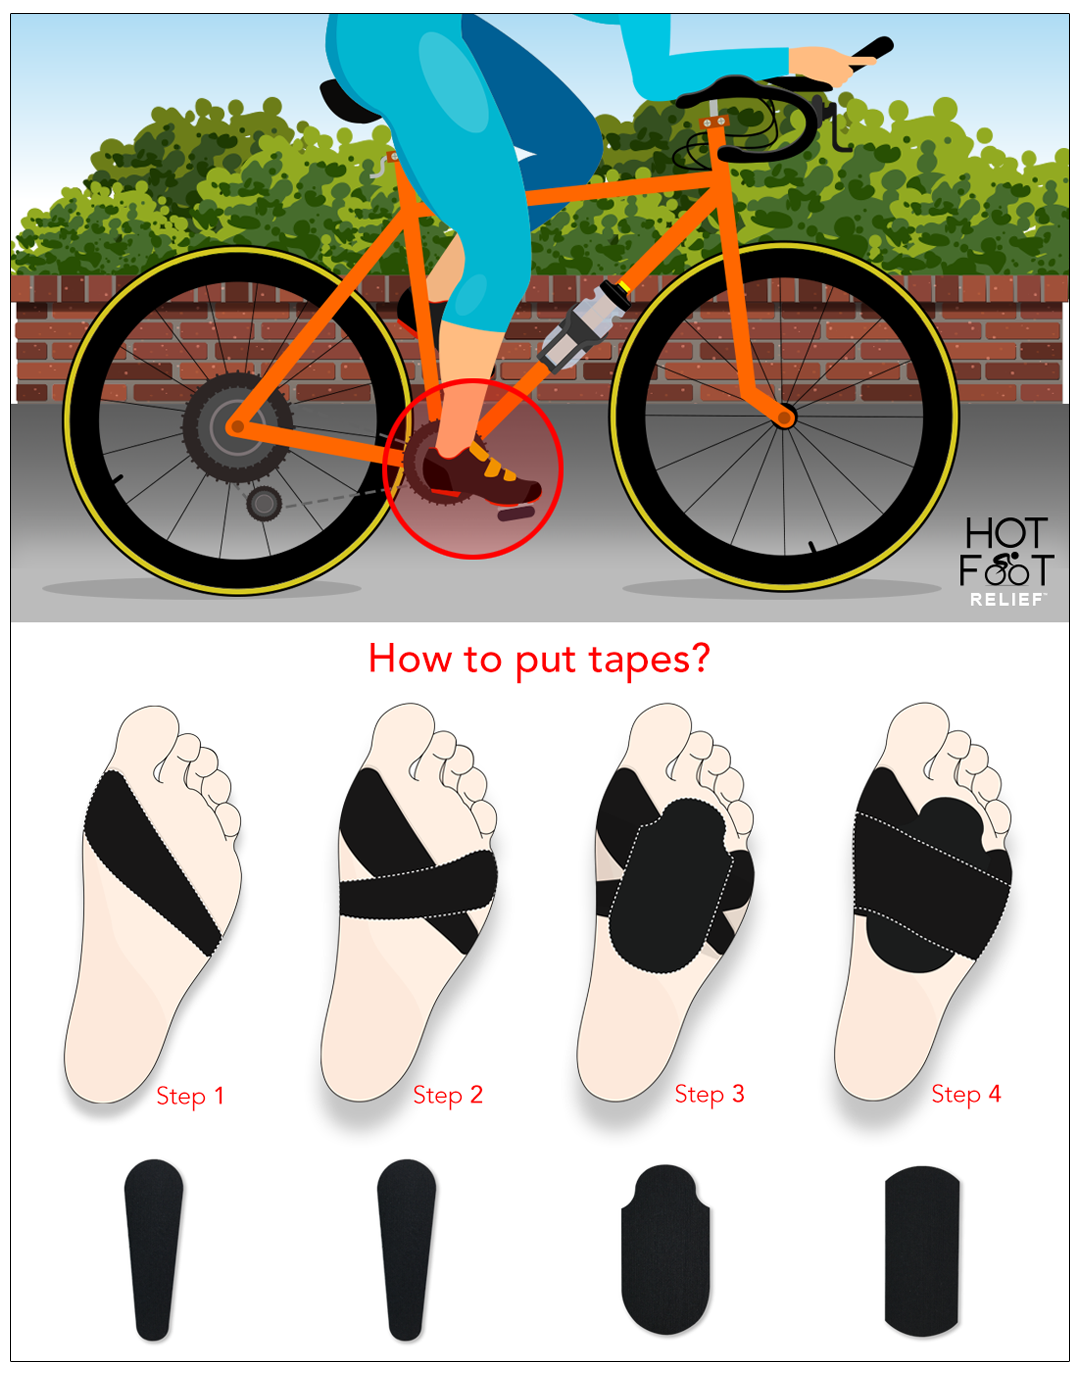
Today we are going to talk about ‘hot’ feet. So, hot feet is something that cyclist can get when they do a lot of cycling and the ball of the foot here begins to burn after cycling. Sometimes it can start to burn only after 25km, other times 50km or 75km. This part of the foot begins to burn and what I’m going to do is explain what the anatomy of the foot occurs that makes the problem happen.
So, what I’m going to do is show you why you can get burning on the ball of the foot here while cycling. There are three arches in the foot – there’s one arch here, then there is the biggest one that everybody knows about on the inside of the foot, and then there is another transverse arch here. Now, most people lose this transverse arch and when that happens these metatarsal bones through here drop down and the nerves in between here get pinched. This can make the foot become numb and makes the foot ‘burn’ during exercise in this area here.
So, we do something to keep these three bones positioned upwards and pushed in to the skin.
Say, this is the foot and we’re going to get some tape and put this on to the foot to squeeze and lift the transverse arch back up again. We put this across the foot, and the best time to do this is actually outside of cycling. You want to do this every day for about 2-4 weeks. When you put this on you must make sure that you squeeze the foot together to form the transverse arch. For the last one, you put this one up underneath the toes to pull the fat pad back down that has migrated up under the toes.
So, you would wear this every day for about 2-4 weeks and you change it every morning, wear it all day, and that would lift the transverse arch back up again so that you do not get burning, numbness or pain in the ball of the foot.
This product has a two week supply so if you would need to use it for both feet, you need to get two packs.
Enjoy the rest of your Friday and thank you for watching Foot Talk Friday!
For appointments and other queries: Call: +971 4 3435390 WhatsApp: +971 50 355 3024
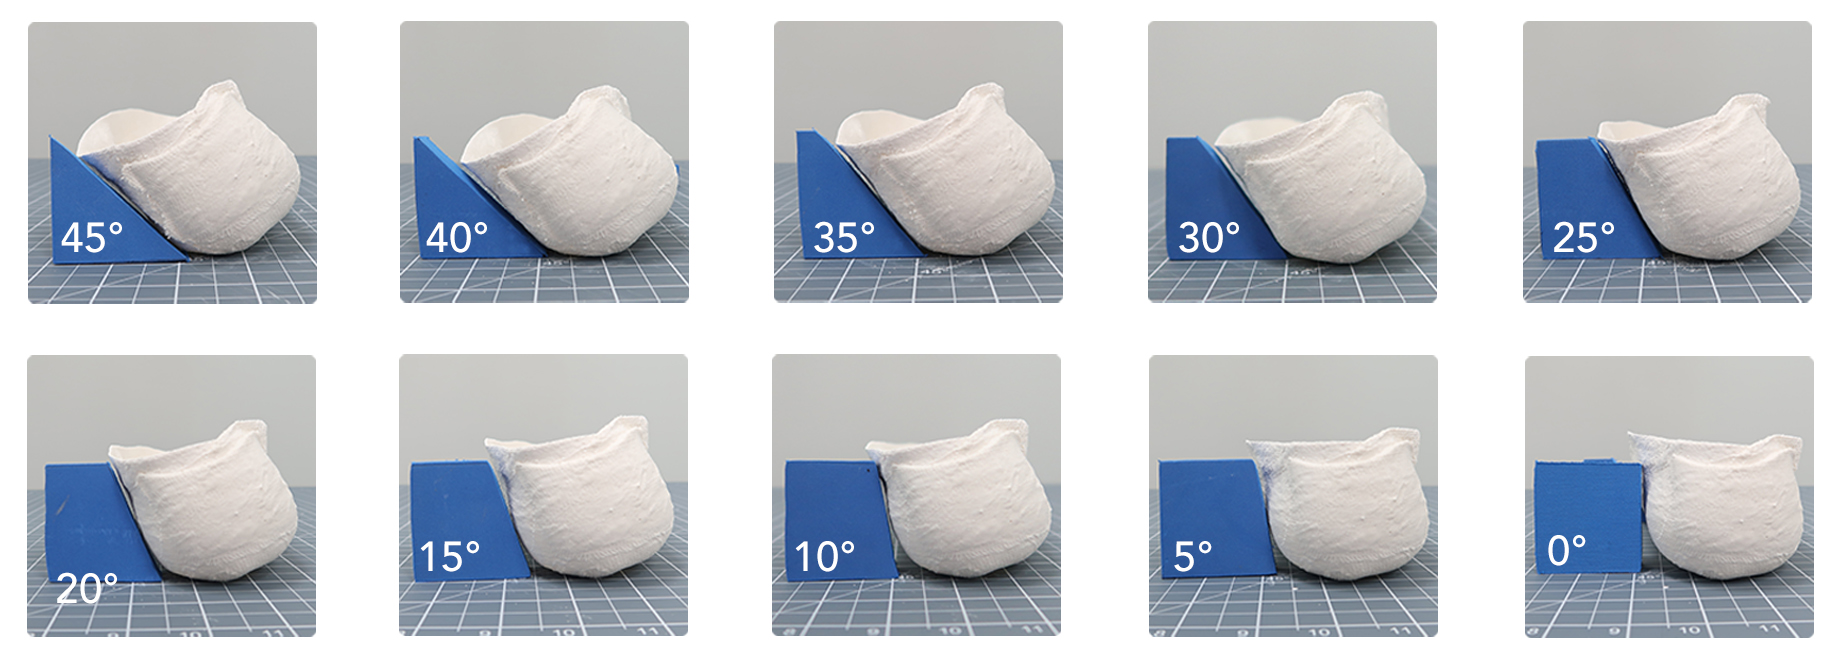
For orthotics, what we do here in the clinic is examine the foot first. For example, say you come in here with a foot problem and the original issue is your foot leaning and its collapsing the arch. Well, everybody’s feet lean in different angles and that is why we want to know what the degree of every patient is between the left and right foot.
So, this cast is zero, it is absolutely straight. What I’ve done is I’ve made lots of little angles from 45 degrees (40, 35, 30, 25, 20, 15, 10, 5, and 0) just to show you the angles that we use to determine the amount that the foot leans in.
Now, why it is important to discover how much the foot leans in is because someone’s foot leans in only about 10 degrees the arch will collapse. The arch will also collapse if someone’s foot leans in 45 degrees. We want to determine how many degrees your foot leans in because usually, for example, if you are an adult male your foot will align 5 degrees every 6 weeks. Or, if you are a growing child about the age of six or seven it will take 5 degrees in 6 months to get the ankle straighter. So, there’s a big difference between children, adult males, adult females and the angle so that’s why it’s important to determine how much your foot leans in.
Say for example, does your foot lean in 45 degrees or does it lean in only 15 degrees? Of course, a straight foot doesn’t lean at all so that’s a zero degree angle. We have to be scientific about it and instead of just making you an insole exactly the shape of your foot (that won’t correct the angle of your ankle if it leans in which is normally the underlying problem of a collapsed arch). That’s why we like to find out why the arch is flat – is it because you truly have a flat foot which is extremely rare, we might only see a couple of cases a year, or is it because your foot leans in. If your foot leans in then we make something exactly the shape of your foot and we use the angle measurers to determine how many degrees it takes to get the ankle straight. Then, we would divide it by 5 as well as considering your age and if you are male or female. It does make a big difference between a male and female.
Male ligaments are stronger and less flexible so they will take about 6 weeks to get 5 degrees. Adult females take 6 to 12 weeks to get 5 degrees straight. A young growing child with growth hormones will take about 6 months. Older children (17 and 18 years old) that’s a little different – we treat them as adults because their growth hormone depletes around those ages significantly. That’s why it’s very important to measure the angle of the ankle. We call this hyper pronation, we hear a lot of the time when somebody had hyper pronation of their feet or of their ankle – what that means is that their foot leans in.
Now, we have hyper supination which is where the feet leans out, if your feet leans out you’ll get a very high arch and almost like bow legs and easy sprained ankles but most of the time we see flat feet and feet that lean in.
Every 5 degrees determines a new orthotic, so the arch changes, the foot changes phenomenally with the difference in the ankle alignment. As you straighten the ankle, the arches develop and you don’t have just one arch in the foot there are three (the medial, lateral, and the forefoot arch).
The forefoot arch is a little curve underneath the front of your foot here. The lateral arch is on the outside of the foot, and then the medial foot arch is along the medial aspect. The inside aspect of the foot is normally stronger, so that’s why we also address all three arches of the foot because if you were like a little ant underneath the foot and you were standing here, when you look up the ceiling should be dome-shaped across the way, it’s not just one arch here. That’s why when we start to tilt and align the foot, the whole foot (muscular wise and bone structure wise) changes.
Now, we get a lot of questions about “can flat feet be fixed?”
We have to determine what type of flat feet you have, so if you have a hyper pronated flat foot, of course it can be corrected and that’s the most common one that we see.
So, as we tilt the foot back to straight and engage all the arches and get the alignment of the ankle back to straight. Perfect! No more flat feet, so it’ a myth that flat feet cannot be fixed and actually in adults it’s faster to fix flat feet than it is for children. It is a misconception that flat feet can’t be fixed.
It’s just like braces for your teeth, your teeth have already formed but it doesn’t mean you cannot get braces to align your teeth. It’s the same with feet, just because your bones have grown and stopped growing, it doesn’t mean you cannot manipulate the position of the bones. The bones are held together by ligaments and the ligaments are the things that determine where you bones sit.
The muscles can hold and move your foot but you can’t actually hold your foot in a position for more than 20 minutes because the muscle will fatigue and you’ll start to vibrate and shake and then you will have to relax your feet. But, the ligaments can’t hold your feet in place, like you cannot push your teeth in to position – you need an orthodontic brace for that. That’s why we make the orthotics to tilt the foot and keep it position for 6 weeks – 6 months, then we change it again to get another 5 degrees corrected.
So I hope that is more useful information in determining what a flat foot is – what a hyper pronated foot is, what do the angles mean, what the foot leaning in means, how does that interrupt the arches of the foot and how it can be corrected.
Enjoy your Friday!
For appointments and other queries: Call: +971 4 3435390 WhatsApp: +971 50 355 3024
الحديث عن القدم أيام الجمعة: قياس زوايا القدمين لتقويم العظام
مرحبًا بكم في الحديث عن القدم يوم الجمعة!
بالنسبة لتقويم العظام، ما نقوم به هنا في العيادة هو فحص القدم أولاً. على سبيل المثال، لنفترض أنك أتيت إلى هنا وأنت تعاني من مشكلة في القدم وكانت المشكلة الأصلية هي ميل قدمك وانهيار القوس. حسنًا، تميل أقدام الجميع بزوايا مختلفة ولهذا السبب نريد أن نعرف ما هي درجة كل مريض بين القدم اليسرى واليمنى.
إذن، هذه الزهرة تساوي صفرًا، إنها مستقيمة تمامًا. ما فعلته هو أنني قمت بتكوين الكثير من الزوايا الصغيرة بدءًا من ٤٥ درجة (٤٠، ٣٥، ٣٠، ٢٥، ٢٠، ١٥، ١٠، ٥، و٠) فقط لأوضح لك الزوايا التي نستخدمها لتحديد المقدار التي تميل إليها القدم.
الآن، السبب وراء أهمية اكتشاف مدى ميل القدم هو أن قدم شخص ما تميل نحو ١٠ درجات فقط، مما يؤدي إلى انهيار القوس. سوف ينهار القوس أيضًا إذا مالت قدم شخص ما بزاوية ٤٥ درجة. نريد تحديد عدد الدرجات التي تميل إليها قدمك، لأنه عادة، على سبيل المثال، إذا كنت رجلًا بالغًا، ستصطف قدمك بمقدار ٥ درجات كل ٦ أسابيع. أو، إذا كنت طفلاً في سن السادسة أو السابعة تقريبًا، فسوف يستغرق الأمر ٥ درجات في ٦ أشهر للحصول على استقامة الكاحل. لذلك، هناك فرق كبير بين الأطفال والذكور البالغين والإناث البالغات والزاوية، ولهذا السبب من المهم تحديد مدى ميل قدمك للداخل.
لنفترض على سبيل المثال، هل تميل قدمك إلى ٤٥ درجة أم أنها تميل إلى ١٥ درجة فقط؟ بالطبع، القدم المستقيمة لا تميل على الإطلاق، لذا فهي زاوية بدرجة صفر. يجب أن نكون علميين بشأن هذا الأمر وبدلاً من مجرد صنع نعل داخلي لك على شكل قدمك تمامًا (وهذا لن يصحح زاوية كاحلك إذا كان يميل إليه وهو عادة المشكلة الأساسية المتمثلة في انهيار القوس). لهذا السبب نرغب في معرفة سبب كون القوس مسطحًا – هل يرجع السبب في ذلك إلى أن لديك قدمًا مسطحة بالفعل، وهو أمر نادر للغاية، قد نشاهد بضع حالات فقط في السنة، أم أن قدمك تميل إلى الداخل. إذا كانت قدمك يميل إلى الداخل ثم نصنع شيئًا على شكل قدمك تمامًا ونستخدم مقاييس الزاوية لتحديد عدد الدرجات اللازمة لجعل الكاحل مستقيماً. ثم نقسمها على ٥ مع الأخذ في الاعتبار عمرك وإذا كنت ذكرا أو أنثى. إنه يحدث فرقًا كبيرًا بين الذكر والأنثى.
تكون أربطة الذكور أقوى وأقل مرونة، لذا ستستغرق حوالي ٦ أسابيع للحصول على ٥ درجات. تستغرق الإناث البالغة من ٦ إلى ١٢ أسبوعًا للحصول على ٥ درجات متتالية. سيستغرق نمو الطفل الصغير المصاب بهرمونات النمو حوالي ٦ أشهر. أما الأطفال الأكبر سنًا (١٧ و١٨ عامًا) فالأمر مختلف قليلًا – فنحن نعاملهم كبالغين لأن هرمون النمو لديهم يستنزف بشكل كبير في تلك الأعمار. ولهذا السبب من المهم جدًا قياس زاوية الكاحل. نحن نسمي هذا الكب المفرط، ونسمع في كثير من الأحيان عندما يعاني شخص ما من فرط كب في قدميه أو كاحله – ما يعنيه ذلك هو أن قدمه تميل إلى الداخل.
الآن، لدينا فرط الاستلقاء وهو المكان الذي تميل فيه القدمان إلى الخارج، إذا كانت قدماك تميل إلى الخارج فستحصل على قوس مرتفع جدًا وتشبه تقريبًا الساقين المقوستين والكاحلين السهلين التواءهما ولكن في معظم الأوقات نرى أقدامًا مسطحة وأقدامًا تميل إلى الداخل .
يتم تحديد جهاز تقويم جديد كل ٥ درجات، وبالتالي يتغير القوس، وتتغير القدم بشكل هائل مع الاختلاف في محاذاة الكاحل. عندما تقوم بتقويم الكاحل، تتطور الأقواس ولا يكون لديك قوس واحد فقط في القدم، بل هناك ثلاثة (القوس الوسطي والجانبي ومقدمة القدم).
قوس مقدمة القدم عبارة عن منحنى صغير أسفل مقدمة قدمك هنا. يقع القوس الجانبي على الجانب الخارجي من القدم، ثم يكون قوس القدم الإنسي على طول الجانب الإنسي. عادة ما يكون الجانب الداخلي للقدم أقوى، ولهذا السبب نتناول أيضًا أقواس القدم الثلاثة لأنه إذا كنت مثل النملة الصغيرة أسفل القدم وكنت تقف هنا، فعندما تنظر إلى الأعلى، يجب أن يكون السقف على شكل قبة على الجانب الآخر من الطريق، ليس هناك مجرد قوس واحد هنا. ولهذا السبب عندما نبدأ بإمالة القدم ومحاذاة القدم، تتغير القدم بأكملها (البنية العضلية والعظام).
تصلنا الآن الكثير من الأسئلة حول “هل يمكن إصلاح القدم المسطحة؟“
علينا أن نحدد نوع القدم المسطحة لديك، لذلك إذا كان لديك قدم مسطحة مفرطة النطق، فمن الممكن بالطبع تصحيحها وهذا هو الأكثر شيوعًا الذي نراه.
لذلك، عندما نقوم بإمالة القدم للخلف إلى الوضع المستقيم ونشرك جميع الأقواس ونعيد محاذاة الكاحل إلى الوضع المستقيم. ممتاز! لا مزيد من الأقدام المسطحة، لذا فمن الأسطورة أن الأقدام المسطحة لا يمكن إصلاحها، وفي الواقع يكون إصلاح الأقدام المسطحة أسرع لدى البالغين مقارنة بالأطفال. من المفاهيم الخاطئة أن القدم المسطحة لا يمكن إصلاحها.
إنه مثل تقويم أسنانك تمامًا، فقد تكونت أسنانك بالفعل ولكن هذا لا يعني أنه لا يمكنك الحصول على تقويم لمحاذاة أسنانك. الأمر نفسه ينطبق على القدمين، فمجرد نمو عظامك وتوقفها عن النمو، لا يعني أنه لا يمكنك التحكم في موضع العظام. يتم ربط العظام معًا بواسطة الأربطة والأربطة هي الأشياء التي تحدد مكان عظامك.
يمكن للعضلات أن تمسك قدمك وتحريكها، لكن لا يمكنك في الواقع تثبيت قدمك في وضع أكثر من ٢٠ دقيقة لأن العضلات سوف تتعب وستبدأ في الاهتزاز والاهتزاز، وبعد ذلك سيتعين عليك إرخاء قدميك. لكن الأربطة لا تستطيع تثبيت قدميك في مكانها، كما لا يمكنك دفع أسنانك إلى مكانها الصحيح – فأنت بحاجة إلى دعامة لتقويم الأسنان للقيام بذلك. ولهذا السبب نصنع جهاز تقويم العظام لإمالة القدم والحفاظ على وضعها لمدة ٦ أسابيع – ٦ أشهر، ثم نغيرها مرة أخرى لتصحيح ٥ درجات أخرى.
لذا آمل أن تكون هذه معلومات أكثر فائدة في تحديد ماهية القدم المسطحة – ما هي القدم المفرطة في الكب، وماذا تعني الزوايا، وماذا يعني انحناء القدم، وكيف يعطل ذلك أقواس القدم وكيف يمكن ذلك تصحيح.
Today we are going to talk about children, growing, and intoeing.
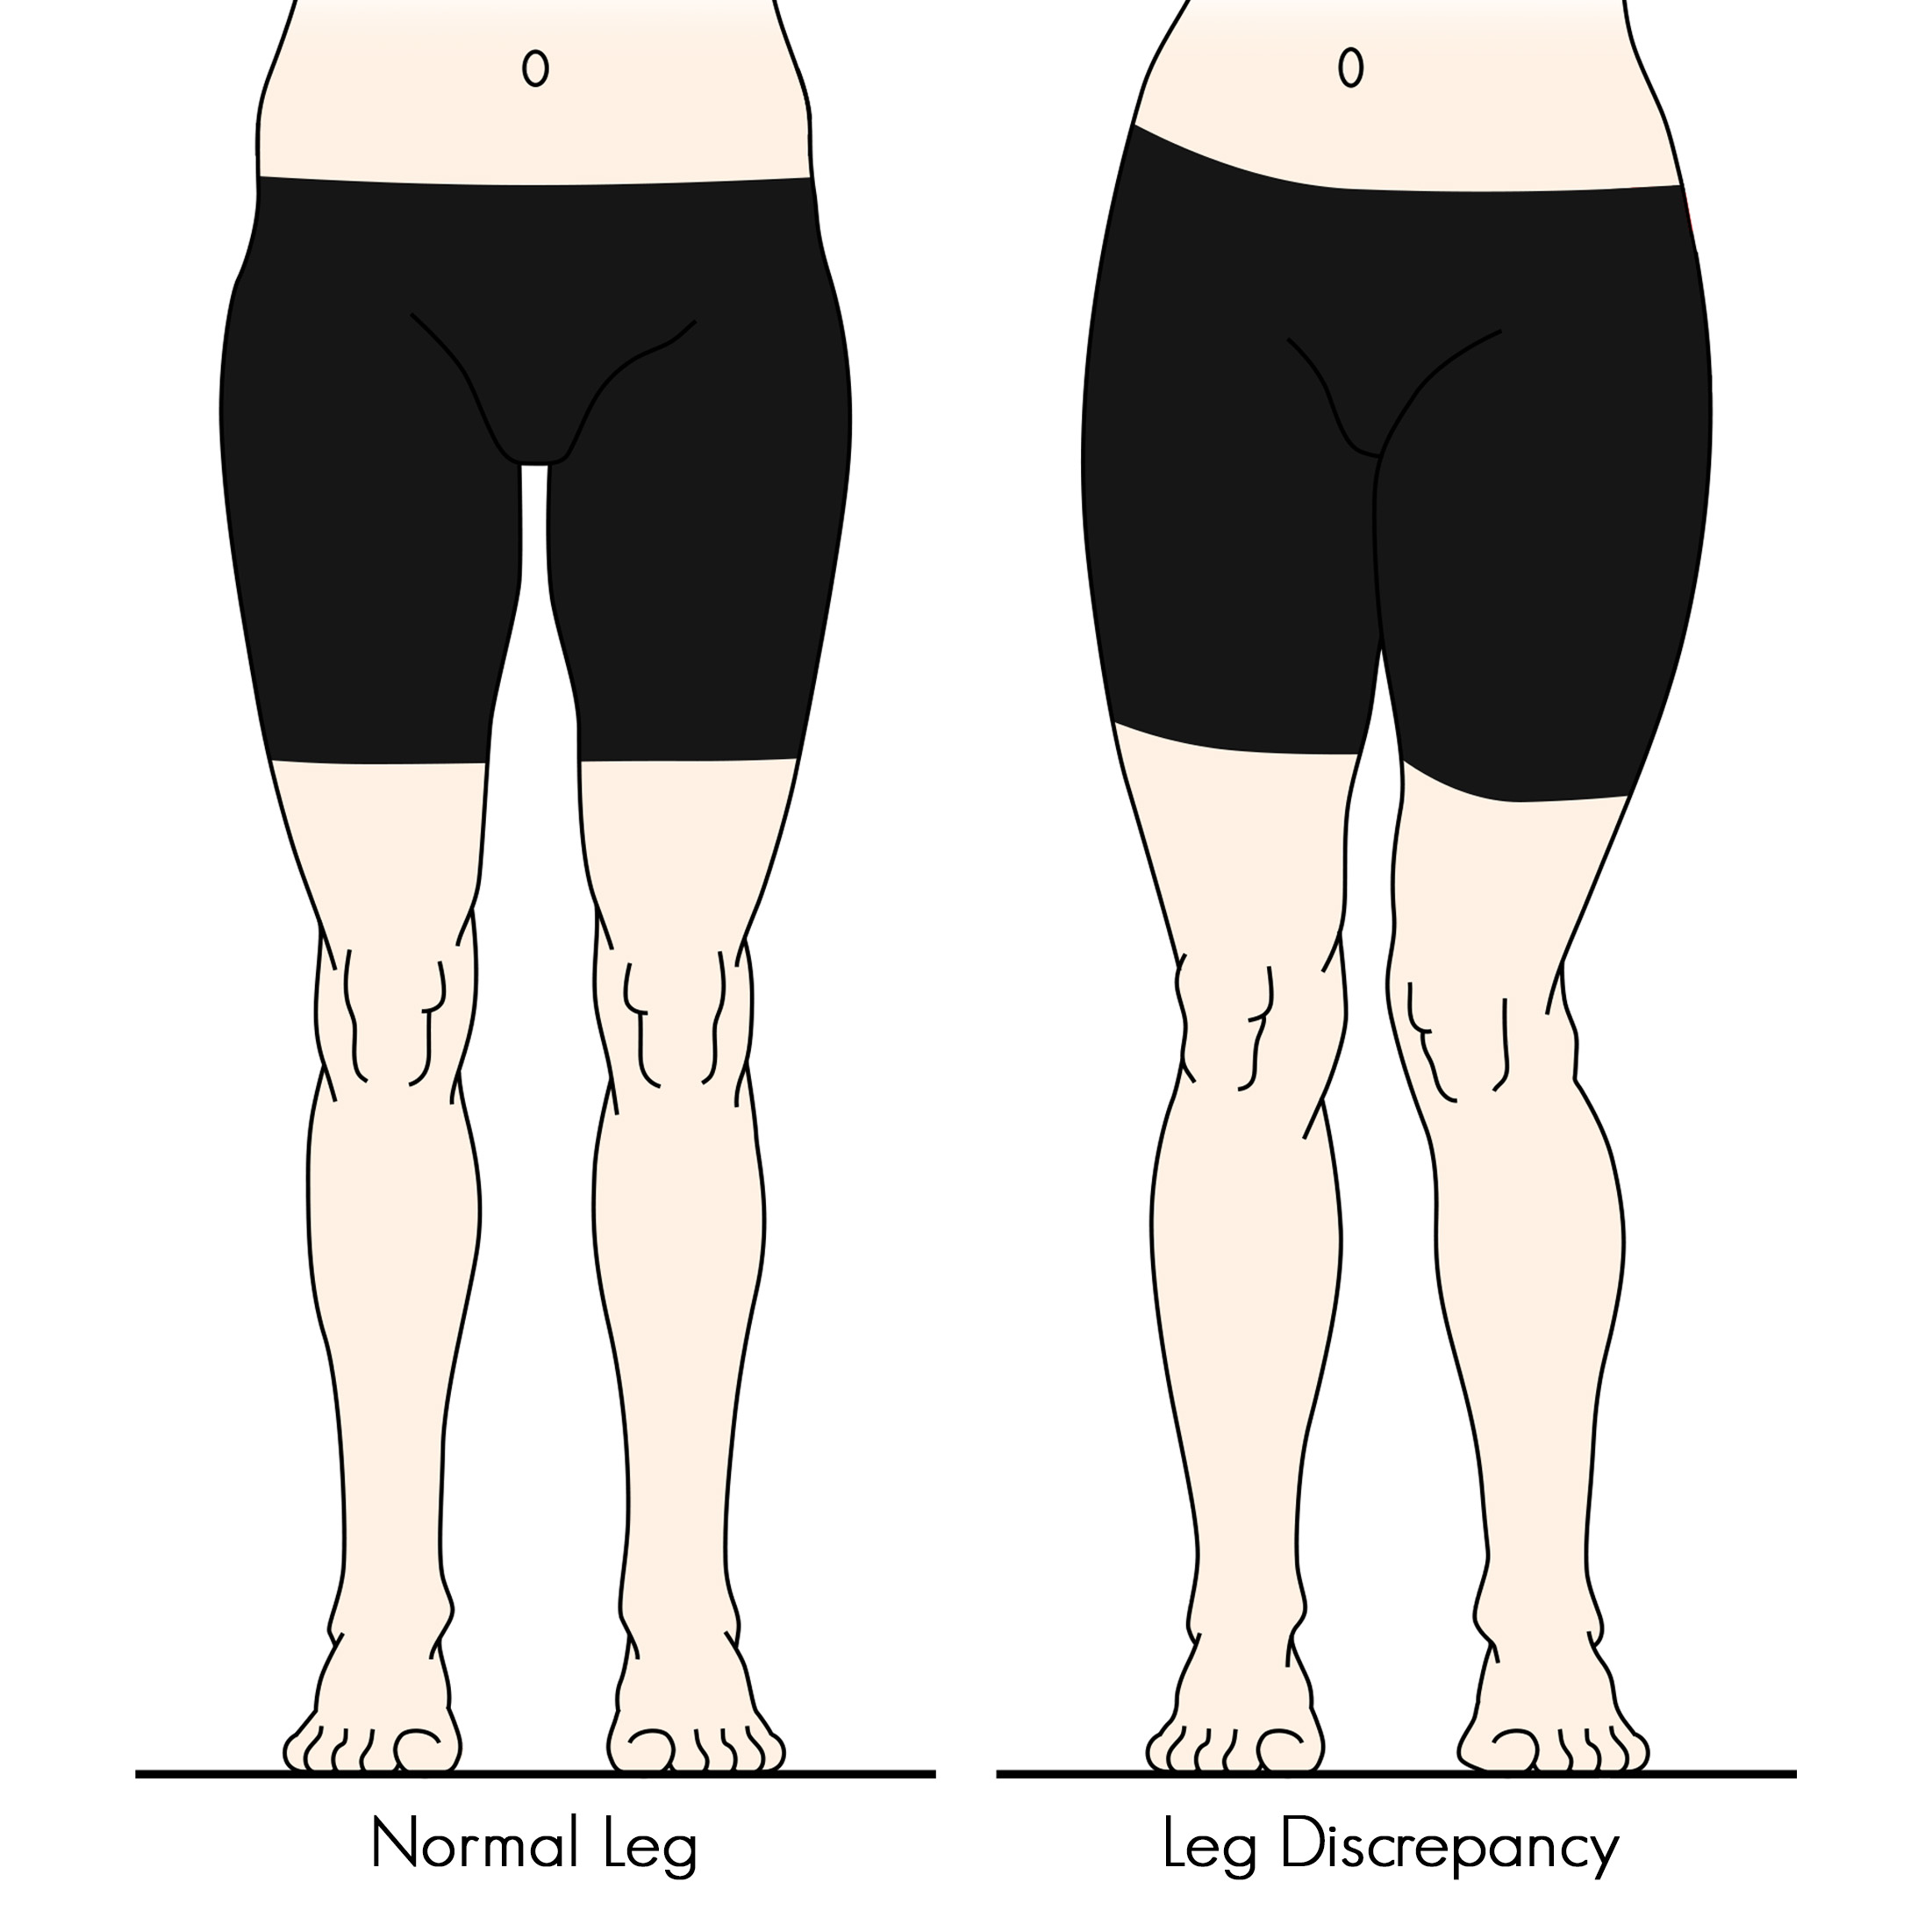
So when children grow, the legs grow (one leg grows then the other, then the other, etc.). The legs don’t grow at the exact same rate. It is particularly common for fast-growing children to suddenly look like one of the legs is a little bit longer than the other and they like to bend the longer one when they stand and lean on the shorter one. Sometimes when one leg becomes a little too long the pelvis can tilt slightly so one foot can start to intoe.
What we do for children is we normally don’t like to correct the leg length discrepancy when it is minor. When it is minor it is normal. When you have a shorter leg and the child is running it impacts the ground a bit harder and forces the muscles to work a bit more and becomes stronger. They attach to the end of the bone and that’s what makes that side of the bone catch up. So, it’s normal for children to have leg length discrepancy.
Now when it’s too much of discrepancy (one is much longer that the other) then it can actually cause spinal and bone growth problems. So, there is a time where we would then interfere with the child’s foot and leg length alignment. It depends on the range of normal and the range of abnormal.
But, if you are ever worried about a child’s leg length discrepancy always go and visit your pediatrician. They will check the leg lengths, then they might refer you to a chiropractor or they might refer you to us to check the leg lengths and the foot alignment as well.
So, we check the leg lengths when there is some intoeing only on one side. Other problems that can cause intoeing on one side is muscular imbalance but that is quite rare. Leg length is the main issue with a child where one foot intoes.
Now, intoeing with both feet is a completely different issue and has nothing to do with leg lengths. That’s more to do with the pelvic tilt or the curvature of the leg or foot. So we would just need to find out which one that is. Any child that has intoeing, particularly on one side, should have an examination by a podiatrist, pediatrician, or the orthopedic just to make sure that everything is okay.
Thank you for watching Foot Talk Fridays and I hope you have a lovely weekend!
For appointments and other queries: Call: +971 4 3435390 WhatsApp: +971 50 355 3024
مرحبًا بكم في الحديث عن القدم يوم الجمعة!
سنتحدث اليوم عن الأطفال والنمو والدخول إلى المنزل.
لذلك عندما ينمو الأطفال، تنمو الأرجل (تنمو ساق واحدة ثم الأخرى، ثم الأخرى، وما إلى ذلك). لا تنمو الأرجل بنفس المعدل بالضبط. من الشائع بشكل خاص أن يبدو الأطفال سريعو النمو فجأة وكأن إحدى الساقين أطول قليلاً من الأخرى وأنهم يحبون ثني الأطول عندما يقفون ويتكئون على الأقصر. في بعض الأحيان، عندما تصبح ساق واحدة طويلة جدًا، يمكن أن يميل الحوض قليلاً حتى تبدأ إحدى القدمين في الدخول.
ما نفعله للأطفال هو أننا عادة لا نحب تصحيح التباين في طول الساق عندما يكون بسيطًا. عندما يكون طفيفا فمن الطبيعي. عندما تكون ساقك أقصر والطفل يركض، فإن ذلك يؤثر على الأرض بشكل أقوى قليلاً ويجبر العضلات على العمل أكثر قليلاً وتصبح أقوى. إنها تلتصق بنهاية العظم وهذا ما يجعل هذا الجانب من العظم يلحق بالركبة. لذلك، من الطبيعي أن يكون لدى الأطفال اختلاف في طول الساقين.
الآن عندما يكون هناك الكثير من التناقض (أحدهما أطول بكثير من الآخر) فإنه يمكن أن يسبب مشاكل في نمو العمود الفقري والعظام. لذلك، هناك وقت نتدخل فيه بعد ذلك في محاذاة طول قدم الطفل وساقه. ذلك يعتمد على نطاق الطبيعي ونطاق غير طبيعي.
ولكن، إذا كنت قلقًا بشأن التباين في طول ساق الطفل، فاذهب دائمًا لزيارة طبيب الأطفال الخاص بك. سوف يقومون بفحص أطوال الساق، ثم قد يحيلونك إلى معالج تقويم العظام أو قد يحيلونك إلينا للتحقق من أطوال الساق ومحاذاة القدم أيضًا.
لذا، فإننا نتحقق من أطوال الساقين عندما يكون هناك بعض الدخول على جانب واحد فقط. المشاكل الأخرى التي يمكن أن تسبب الدخول على جانب واحد هي عدم التوازن العضلي ولكن هذا نادر جدًا. طول الساق هو المشكلة الرئيسية التي يواجهها الطفل حيث تدخل إحدى قدميه.
الآن، يعد الاستحمام بكلتا القدمين مسألة مختلفة تمامًا ولا علاقة لها بطول الساقين. يتعلق الأمر أكثر بإمالة الحوض أو انحناء الساق أو القدم. لذا، كل ما علينا فعله هو معرفة أي منها. يجب أن يخضع أي طفل يتبول، خاصة من جانب واحد، لفحص من قبل طبيب الأقدام أو طبيب الأطفال أو طبيب العظام فقط للتأكد من أن كل شيء على ما يرام.
شكرًا لك على مشاهدة الحديث عن القدم يوم الجمعة وأتمنى لك عطلة نهاية أسبوع جميلة!
 Additionally, an insole is very helpful for easing plantar fascia. Insoles placed in shoes supports the arch and controls the movement of the foot. Most cases of plantar fasciitis happens on one foot where the foot or the pelvis leans in slightly. This puts intense stress on the plantar fascia band where it attaches on to the heel bone. By lifting this arch and aligning the ankle and foot, the plantar fascia can go back to its resting state.
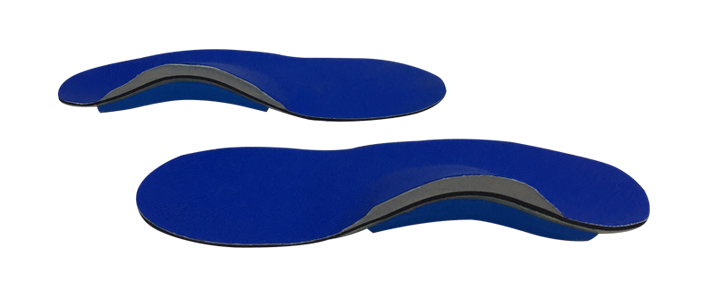


 Can I still wear sandals with flat feet?
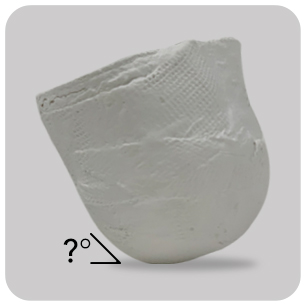 How long does it take for my flat feet to become straight and aligned?
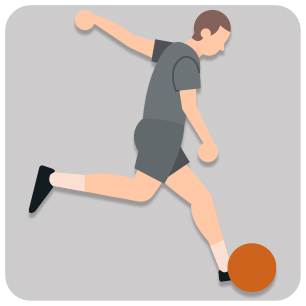 Could my flat feet be affecting my sports performance – golf, football, etc?
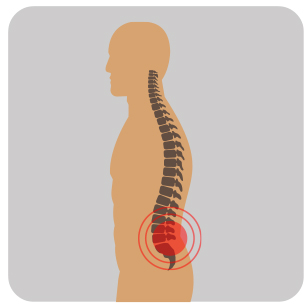 How can my flat feet cause back pain?
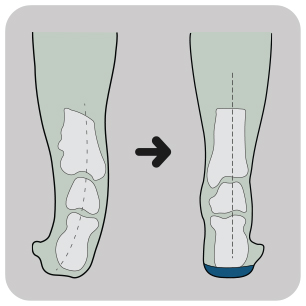 Do I need to have surgery to fix my flat feet?
 I still want to wear high heels/stylish shoes… can I do this while wearing orthotics? Do I have to wait until my treatment is over?
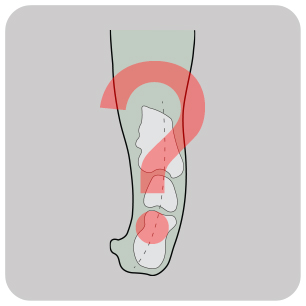 Is it too late for me to fix my flat feet?
 Are my flat feet the cause of my bunions/corns?
 How long does my child have to wear orthotics? Will they still be able to participate in school sports?
 What is the best school shoe/PE shoe for my child? Which brand?
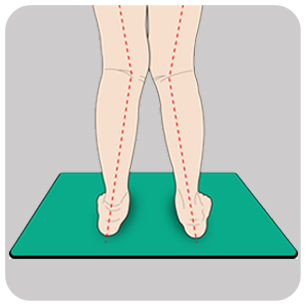 My child has ‘knock knees’ when they walk and stand. Will orthotics help fix this?