
fbpx

Please wait...


BLOG

No more posts


Subtitles:

Welcome to Foot Talk Friday!

Over summertime we’ve got so many travellers going to nice destinations and doing a lot of walking in shoes that they normally wouldn’t wear so much, like walking shoes with socks, and maybe they are used to wearing sandals here in the Middle East.

So, when your skin is very baby soft around the edges you can get blisters, calluses and corns. What we recommend is something that is really light and it fits in your bag (even your purse or wallet), it takes up no space.

We have ones like this, we call these toe pads or bunny pads (actually we call this a bunny nose because it’s so soft – but no bunnies were harmed in making of these!).  And you put it on your fifth toe like this so if you’re wearing strappy sandals, or you’re wearing high-heel shoes, or you’re wearing a business shoe, or sports shoes that might feel like it’s rubbing on the toe from the London heat and sweat right now.

That’s why I would recommend putting bunny pads – keep them for the whole family so if somebody complains about a hot spot on their foot you can put that on. 

You can also put them on the second toe or the third toe, a lot of people come back after summertime with bursas on their toes – they sometimes look like little swellings on the top of the toes and they sometimes think that they’re corns. So, if you use this when your toes are gripping a little bit and rubbing on the top of the shoe it prevents from bursa and discoloration of the skin.

Then these ones if you’re wearing shoes you’re not used to (like the heel on one of the shoe because there’s always one bigger foot and one smaller foot for almost all human beings) is that one of the bigger foot can rub and press on the back of the heel a little bit, so this would go in the back of the shoe on the heel area and that instantly stops hot spots and stops a blister from forming.

You can also use them behind the big toe – most people get hard skin behind the big toe and along the side of the foot. So, you can use the long pads (we call it bunny ears) behind the big toe where you get calluses and burning as well.

Then finally we have the bunny face. You can put this under the ball of your foot so if you’re wearing high heel shoes or your sandals gets sweaty and you’re slipping or something like that, you can just put this behind your toes under the ball of your foot like this. So, if you’re wearing high heel shoes or doing a lot of walking it cushions the ball of your foot. You can also use it on your heel for extra cushioning (it’s a perfect size for your heel).

But there is another handy trick to this pad and it’s where you can actually put it up underneath the arch of your foot. For example, your arch is hurting from doing a lot of standing and walking and normally people get one arch that hurts them because we all have a pelvic tilt because we have a leg length discrepancy (it is totally normal). Say for example the arch of your foot is here, if you stick this pad underneath your arch and you pull it up it helps to lift your arch and to keep it up. So, there’s a lot of handy different ways that all of these little pads can help your feet.

These pads have been taken to the top of Everest, from one side of the pole to the other side of the pole, they have come in handy with a lot of adventures! The weight is hardly even anything, but if you’re going to go hiking, go on forest walks, or you are going to do lots of walking in cities like Rome, London or Paris that you’re not normally used to doing – definitely take them in a little pouch in your bag and anybody in the family that complains about a hot spot then they are absolutely perfect to use.

Enjoy your Friday!

For appointments and other queries:
Call: +971 4 3435390
WhatsApp: +971 50 331 4978


Subtitles:

Welcome to Foot Talk Fridays!

Today we’re going to talk about children’s school shoes. 

So, the time is coming where you’re trying to leave it as close as possible to the start of this school term so that the child’s feet is accurately fitted to the school shoes for the school term. 

For example, when buying shoes, we want a shoe that’s quite sturdy and strong. These are Adidas and I really like it because they have velcro straps so it makes it very easy to take on and off. 

Older children (over the age of eight and on wards) we encourage them by that age that they should be tying their own laces for school. But for very young children it makes it easier for moms and dads to have velcro straps. 

The reason that we also like Adidas, like this type for the school shoes (it comes in black for school and white for sports) is they have nice insoles that are fitted.

Now the good thing about Adidas and Eco school shoes do it, also – do you see this grid pattern here? This shows where the child’s foot should be fitted when they’re in the shop (that first line). Then these diagonal lines here show where the child should be able to have growth during the school terms. That last line is where the children should get a new pair of shoes when their toes get to the end there.

This is really helpful as well if you’re not sure about the shoe fitting in the shop, you can always take this easily out of the shoe (you saw how easily this one came out of the shoe). Ask your child not to sit but to stand on this, I don’t want them to be sitting when they place their feet on it, I want them to stand on it. Just get the heel matching up to this back line and the big toe and small toes should not be beyond that first line here. Then that’s the perfect size for them.

 Getting onto girl school shoes, so for example your child does wear an orthotic for flat feet or something like that, the insole comes out of this shoe and quite a large orthotic (this is a child that leans in almost 45 degrees) will fit into a shoe like this. 

The reason that we like this is that it has this extra velcro strap on the top which acts like a seat belt, so that when the child is running or if they have a strong orthotic inside there, the seat belt strap keeps the foot and their heel down inside the shoe. 

Now another reason for this is so that you can get quite a generous sized shoe for the child to allow them to grow. If you buy your child ballerina style shoes without this Mary Jane style strap, you will have to get a tight-fitting shoe and we see so many young girls with corns and calluses on the outside of their toes because they had to get tight fitting shoes so it doesn’t slip off with their heel.

So that you can do the same thing that is allowed for other types of shoes in children, you want this extra space to grow. You’ll be able to do that in a Mary Jane style shoe, they will have the extra space to grow without the heel slipping out the shoe because they have the seat belt strap. So please, please, please for children, please don’t buy the ballerina style of shoes. I see there’s not much cushioning normally underneath so they feel heel pain and there’s not much support at the side of the ballerina pump so the arches become quite soft and strained, it can cause a lot of arch pain. And then of course they have to be tight-fitting style school shoes to keep the shoe on, so please don’t buy ballerina styles -please buy the Mary Jane’s styles with the strap on the top.

I hope that help with finding shoes for children for the upcoming school term. 

Enjoy your Friday!

For appointments and other queries:
Call: +971 4 3435390
WhatsApp: +971 50 331 4978


Subtitles:

Welcome to Foot Talk Fridays!

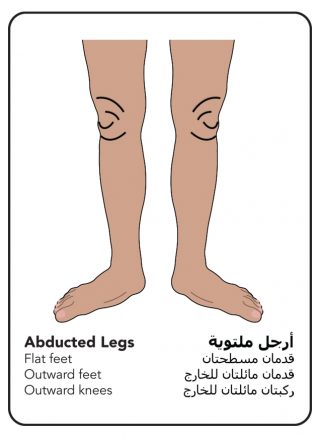
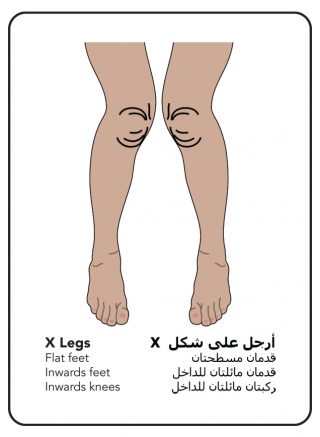
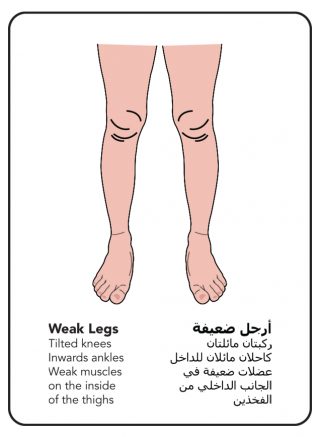
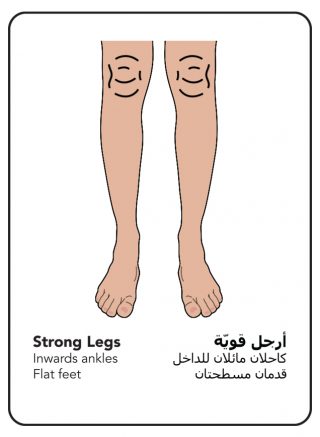
We’re going to discuss ‘knock knees’ and that’s when the child’s knees lean in together, called ‘Gene Valgum.’ When the child’s knees go away from each other it’s called ‘Genuverous’. 

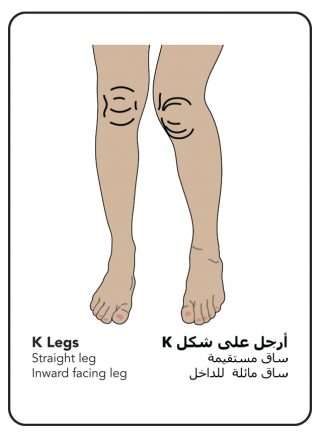
Gene Valgum is quite common especially if the feet lean in. If the feet lean in, the knees can internally rotate and the knees can begin to bend together causing an X appearance. Some children might have a straight leg and one knee that bends in and that’s what we call a ‘K leg’ because it looks like a letter K.

So what we want to do initially is we want to find out where the Gene Valgum comes from – is it coming from the hip? Is it coming from the knee? Is it coming from

https://dubaipodiatry.com/wp-content/uploads/2019/09/Gene-Valgum-2-2.jpg
https://dubaipodiatry.com/wp-content/uploads/2019/09/Gene-Valgum-1.jpg

the foot? Is it coming from the ankle? Once we discover where it’s coming from that will change the treatment plan.

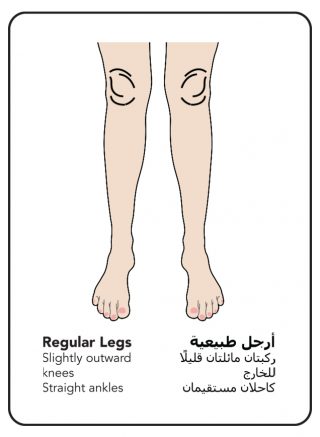
Say for example, we need to get the knee to point out wards and the space to open, we’ll put something underneath the foot that tilts the foot to get the knee to externally rotate again, because normally with the feet straight we want the knees to point at eleven and one o’clock.

The perfect position of the knees is eleven and one o’clock, we don’t want straight ahead knees either, we also don’t want the knees to point to ten and two o’clock or nine and three o’clock, we just want eleven and one o’ clock with the feet straight.

The reason for that is when the feet are straight and the ankles are straight, the hips are set wider, so the knee does have to get 50% of a different angle from the ankle to the hip ratio, so eleven and one o’clock is perfect alignment.

We also have to look at leg length because ‘leg length discrepancy’ is normal with growing children. When one leg grows longer than the other the pelvis will tilt, and one knee will point to a different direction compared to the other.

We have to understand that’s normal for children, but if you notice your child has knees that are leaning in or bending in it’s very important to take them to the podiatrist, or the orthopaedic, of course your general practitioner, or your paediatrician just to get a full scope of assessment done.

But most commonly we use something underneath the feet to tilt the feet to get the knees to change direction which is why if your child has ‘Gene Valgum’ or ‘Genuverous’ you’ll be asked to come and see a podiatrist to get the foot and ankle sorted to help with that.

So, what we do with Gene Valgum is we would put something underneath the foot, and we would tilt the foot (and that’s what this tilt is). Depending on the severity of the Gene Valgum, it depends on how high this wedge is so it can be anything from five degrees up to forty-five degrees in the most severe cases.

Again, say for example it’s a child, we would put a tilted orthotic with how many degrees (this child has a twenty-seven-degree tilt on to theirs) for their Gene Valgum inside school shoes and it fits easily inside the school shoe, of course we always like it with a strap on the top. For boy’s school shoes’ most of the time it’s very easy because they look like sports shoes.

Going back to Gene Valgum, normally if the ankle leans in you can imagine the leg will come up like this and then bend up to the top as well. That’s why we put something underneath the foot that will tilt the foot straight.

I will show you what we mean, say the foot leans inward like this, we would put something tilted so that when a child stands on it they are tilted straight and that’s how we correct Gene Valgum in most cases.

Enjoy your Friday!

For appointments and other queries:
Call: +971 4 3435390
WhatsApp: +971 50 331 4978


  Subtitles: What we’re going to do is take the cast of the foot with the patient non-weight bearing because we want the arch to be the highest. When the patient stands, the arch collapses – we want the foot shape to be at the highest arch.  And now we’re going to let the plaster dry then it’s time to remove the casts.Here we have the perfect arch of the foot and shape of the whole foot, and I’ll show you how we’re going to use this later.  Now that we have taken the cast of the feet, we want to make a pad that is going to give her an excellent arch support and anchors her heel to the forefoot. So, what we want to do is make something that comes around her heel area – up around the outside of her foot up behind the toes, round here, and as high up on the arch as we can possibly go, and back round again. This is what we want to do, something that doesn’t finish at the side of her foot here otherwise it will irritate. So, it must come up the side of the foot to underneath just behind the toes. Up around the side of the arch because we want to help lift the arch right up. This is not as high as we’re going to lift the arch, this is just where the pads going to pull the arch up and then we want the pad to come up and around here so we’re going to make something that is going to be the shape. Then we’re going to do it for the other one also.  So, we’re going to make it come up underneath the toes. Up round the side of the foot, around the heel area, and as high up on the arch as we can possibly go, and back down to meet the toes just around here. We’re going to make something that fits just there on to the foot and takes up very little space. Now that we’ve taken cast of your feet, we’ve made this specially for the shape of the foot and this one especially the shape of the other foot.  We’re going to start with the left foot. This pad, as you can see, is specially made for her foot so we’re going to put this onto the foot. We’re just going to pull that foot back a little bit and we’re going to put it underneath the toes and press it quite firmly (notice that we’re not taking the paper all the way off yet – press firmly then we’re going to remove the rest of it). When we put this on we’re only going to pull it and we ask the patient to relax the foot so that the arch is much higher. Now we’re going to put the pad and secure it firmly around the heel by pulling the tabs up at the side like this and along the outside edge. We have tightened everywhere apart from we’ve not stuck it down in the arch yet. With the patient’s foot completely relaxed it makes the arch much higher – this is the last part we’re going to stick. When you do this you really pull the tape up and underneath the foot like this onto the top of the foot. So now it makes the arch really strong and secure and this material doesn’t stretch so it won’t allow the arch to drop down. Now we’ll put it onto the right foot, same thing again. We’re going to take the paper off of the closed curve side and we’re going to put it underneath the toes and press down firmly then we’re going to ask the patient to relax the foot so that the arch drops and you can see how the foot is compared to when they pull up the foot up and the arch gets flatter. So, we’re going to relax the foot and make the arch high. We remove the rest of the paper backing and then bring it to the heel, place it, and then bring the tabs up. They’re specially cut so there’s no wrinkles around that heel when we curve it around. Then you put it up on the outside of the foot and you will notice we haven’t stuck it yet to the arch and there is a space inside here. This is the last thing that you do is you then absolutely pull the tape up as tight as you can and lift up and secure on to the arch. Now you can see the arch is very nicely held up and this material doesn’t stretch, it curves all around the heel like this so that there’s no wrinkles and that gives them some extra strength for the plantar fascia and heel pain. For appointments and other queries: Call: +971 4 3435390 WhatsApp: +971 50 331 4978


Subtitles:

Welcome to Foot Talk Fridays!

Today we’re going to talk about corns on the feet. You can get corns on the small toe or you can get corn underneath the bones here. Now, when a corn forms it’s either because the shoe presses on the bone and the skin gets squeezed in between and the body protects itself by building up hard skin, or if a bone is dropped down underneath the foot.

One of these bones here holds the metatarsals when the heads of these bones (or we can call them the knuckle of the feet). When these dropped down, the body defends itself by building some hard skin underneath, and the hard skin gets harder and harder. That is what we call a corn, it is pure hard skin.

https://dubaipodiatry.com/wp-content/uploads/2019/10/Corns_1.jpg
https://dubaipodiatry.com/wp-content/uploads/2019/10/Corns_2.jpg

So, to fix it of course we can drill out the corn but it will keep coming back because the bone dropped down. What we do is we have to lift the foot here so we could use something like this for the person to wear underneath the foot, using this small ball-shaped pad to lift these bones back up, so that we don’t have the corn coming back again.

We also need to make the foot tighter again to help squeeze the metatarsals to keep it up. To do that we would use something these tapes – they bind the forefoot together and you would apply here every day for 2 weeks to lift these bones up.

Then, these red muscles that we can see on the foot – these should be intensified and that’s what these tiny little electro muscle stimulators are used for. You can put them on your foot for about 10 minutes a day and that innovates these muscles here, so this is for muscle innervation. This is neuromuscular tapes and that’s to keep the ligaments together (the ligaments here are highlighted blue).

Finally, you must wear something like this for about 3 months to lift the ball of your foot pad, but we have to do it gradually just like dental braces capitated too quickly we have to do it in stages so we would lift you up 5 degrees, lift you up 10 degrees and then lift you up 15 degrees to to get the transverse arch lifted back up again and finally if it is an issue with the corn on the right side of the 5th toe, we would simply ask you to stand and we would draw around your feet using a pencil and trim out the shape then we would match your foot guide to your shoe just to show you your 5th toe is extending beyond the width of the shoe and would ask you to get wider shoe, that how we are going to fix the problem of the 5th toe. So hope that helps for foot corns and enjoy your Friday.

For appointments and other queries:
Call: +971 4 3435390
WhatsApp: +971 50 331 4978


Subtitles: Welcome to Foot Talk Fridays! Today we’re going to be talking about a pain in your heel. So, you get pain in your heel particularly in the morning time when there’s a problem with the structure called the plantar fascia. The plantar fascia is a very thick band of collagen and its main purpose is to keep the heel attached to the front of your foot and to keep the arch of the foot intact. During the day, if your arch is beginning to collapse and come down like this, the plantar fascia begins to do its emergency feature and engage. But what happens is where it attaches into the heel bone becomes inflamed and angry. So, when you sleep or sit down for a while this area of the heel bone becomes bruised and tender and swollen, so when you then go to stand on it when you get out of bed, or up from sitting for a while, this is extremely painful. But, as your circulation gets going after about twenty steps it stops hurting.  Although, the underlying problem is where the plantar fascia anchors and attaches into the heel bone. There’s a few ways to help it. The plantar fascia is an emergency feature, it helps to keep the foot arch intact. It also helps to keep the ball of the foot intact to the nice little arch underneath. But, we need to help it if it’s doing its emergency feature every single time you stand or take a step. So, to bring the forefoot closer to the rear foot we would put an insole inside your shoe. The insole would also lift up your arch so the plantar fascia here can relax a little bit. It’s a myth that the plantar fascia stretches, it sits relaxed. When you jump down off of a high wall or jump from a box or something, the plantar fascia then pulls taut but then it should relax as your arch goes back up again. So, if it’s being pulled taut all the time because the arch is collapsing in your foot then it is time to lift the arch and pull the forefoot closer to the rear foot. It also sometimes is common if the foot for example starts to lean in a little bit and depress the arch, so we would also put a small tilt to get the ankle back to straight.  So, that is the most common cause for heel pain in the morning time called plantar fasciitis. What we suggest you do is make an appointment with a podiatrist and the podiatrist will assess you standing and see if your arch here, or sometimes rarely the lateral arch here on the outside is collapsing. If it is, they lift those arches back up again to take the tensile stress off of the plantar fascia. Enjoy your Friday! For appointments and other queries: Call: +971 4 3435390 WhatsApp: +971 50 331 4978


Subtitles:
Welcome to Foot Talk Friday! Today we’re going to talk about tightening the forefoot particularly in men’s feet. So, the forefoot, this is called the plantar fascia and this keeps the structure of the foot together, but there are ligaments underneath all of this area (we’ve highlighted them blue so it makes it a little bit more obvious to see). These blue ligaments hold the knuckles of the foot together and when these get a little bit stretched and create some spaces between the metatarsals the foot gets wider – a bunion and a bunionette can start to form. And that’s where the Tri-Steps Tapes come into play. So, the tri-steps tapes we use across the forefoot in these areas here, and we also use other tapes across the forefoot to tighten, and more tapes along the big toe to straighten the toe if the big toe has already started to become an issue. On the diagram that we’re showing you just now shows how to apply the tapes. There’s ways to apply the tapes to squeeze the forefoot together again and there’s way to apply the tape to pull the fat pad back down to where it’s supposed to be when the transverse arch collapses. Forefoot alignment is easily corrected in most cases with something like Tri-Steps Tapes. Tri-Steps Tapes are neuromuscular tapes and what you do is you peel them off the paper backing like this and the material has a hypoallergenic sticky quality to it. If you can just see it slightly glistening in the light, the tape has lots of little waves into it. In these little waves when it stretches onto the foot, you can see air holes begin to form, so it does allow the skin to breathe as we are putting the tape on. It’s also got elasticity properties so that when we put it onto the foot, we place it on like this, we can pull and stretch the tape to go around the foot and make the foot tight here. So, these neuromuscular tapes are very effective in the forefoot alignment system and that’s what Tri-Steps Tapes are for.  Have a good Friday! For appointments and other queries: Call: +971 4 3435390 WhatsApp: +971 50 331 4978


Subtitles: Welcome to Foot Talks Fridays! Today we’re going to talk about flat feet of any age, for children and adults.  Most of the flat feet that we see at the clinic are indeed not flat, so when the person sits with their foot not on the floor there is a visible arch when they stand, the arch collapse, in most cases. It is because the feet lean in (you can see from the diagram that we’re putting up of what we’re talking about when the feet lean in) and so what we do here at the clinic is we measure how many degrees the foot leans in and then we tilt the foot the opposite direction so that the ankle and the foot fits perfectly straight.  We examine that foot every six weeks, or every twelve weeks, or every six months depending on your age until we get full correction. Enjoy your Friday!
For appointments and other queries: Call: +971 4 3435390 WhatsApp: +971 50 331 4978


Subtitles: Welcome to Foot Talk Fridays! Today we’re going to discuss Bunions. Bunions is where the forefoot widens and this happens when the bones called the ‘metatarsal bones’ in the foot begin to fall away from each other and this increases the width the foot. It’s most noticeable on the bone behind the first toe. This bone protrudes and causes a boney look to the inside of the foot and this is what we call a bunion. So, what we do in this case is we could start to use neuromuscular binding tapes onto the foot to align the metatarsals and straighten the big toe. If the bunion is caused by the arch and the foot, and the ankle is leaning in, then we would also have to make an insole to lift the arch of the foot back up again, taking the stress off of the bunion. Also, using electro muscle stimulator to tighten the weakened muscles due to the position of the bones. So, we will do 3 things: neuromuscular tape binding, electoral muscle stimulation and we would use an insole to lift the arch of the foot and correct the bio-mechanics the way that the foot functions when walking and standing. Enjoy your Friday! For appointments and other queries: Call: +971 4 3435390 WhatsApp: +971 50 331 4978  


Subtitles:

Welcome to Foot Talk Fridays!

Today we’re going to talk about how to fit shoes correctly for the shape of your individual foot. So, different manufacturers have different width fittings for their shoes. For example, you might have a quite fitted shoe and most American brands are made for quite wide, round-shaped feet compared to sub-continent brands that are made for very slim, high-arched feet. It depends on which type of shoe is good for you. We recommend that you ask somebody to draw around your foot while you’re standing, don’t try to do it yourself because it changes the position of the feet, and the most natural

https://dubaipodiatry.com/wp-content/uploads/2019/09/draw-1.jpg
https://dubaipodiatry.com/wp-content/uploads/2019/09/draw-2.jpg

foot shape is when you’re just standing up. So, have somebody draw around your feet using an A4 piece of paper, and then trim round it on the line that you’ve just drawn. Then you get your actual foot, because the feet get a little bit larger when you stand on them, if you draw a line while you’re sitting they maybe half a shoe size smaller because the arch depresses slightly when you put your body weight on to your feet.

Then what you can do when you’re in a shoe shop you can take the liner out of the shoe. Most liners are not glued in very well at the beginning until you’ve walked on them for some time, then they get more sticky and difficult to remove. For example, this one is curved in the end so when we place this on it is not going to go all the way to the back because the curve just contours your heel bone.

So, it goes something like this and it has a little bit more space because obviously when you’re running the fat pad under the ball of your foot allows the foot to slide back and forward slightly, so we don’t ever want to get a shoe that fits your foot exactly. We always want a little bit of space, and you see this white cut-out fits this shape absolutely perfectly, so this would be a perfect shape. Or, if you’re going to buy work shoes you would take this cutting, otherwise some work shoes can bite the foot at the sides here, if it presses on this bone it can enlarge, and if it presses on the fifth toe too much you can get a toe corn.

Moving on to children’s shoes, if you look a little bit closer at this you actually see some white lines on the top here of the insole (if I just bring it into focus a little bit like this). The white lines on the top here are most helpful when you are doing a fitting for children’s shoes. Adidas are very helpful because they put this little line at the back. So, you take this out of the shoe and then the child would stand on it, and make sure that their heel comes to that white line not the back, pink line. When they stand on it their toes should just come to this first line here. When it comes to the first line that is the perfect fitting when you buy new shoes. Then over the next six months as a child begins to grow (or three months depending on the growth rate) you don’t want them to grow anymore up above that last white line. So, that is their growth grid line there, and they can grow over three to six months.

You could take this out of the shoe and have your child stand on it and do the shoe fitting yourself (if you want to do it yourself). Adidas are most helpful with that, or do this method if you’re going to go for a different brand because Adidas is the only one that does it. So, you can draw a line around your child’s foot, trim it out, take them into the shoe shop and take the liner out of the shoe and match the two up just to make sure they have that little bit of growth space at the end.

Thank you for listening and enjoy your Friday!

For appointments and other queries:
Call: +971 4 3435390
WhatsApp: +971 50 331 4978


Copyright Dubai Podiatry 2026. All rights reserved.

WhatsApp us